FB HEADER

Search The Rusted Garden Journal: Just Enter a Key Word or Phrase

Tuesday, January 31, 2012

KNOL: Killing Slugs and Snails with Iron Phosphate

Transfered from Google Knol to store on my blog.


I know I have written about slugs and snails in another Knol. They are that problematic that a second Knol is needed to give a gardener a helping hand. Iron phosphate is the focus for this very green Knol. The warm weather is coming and the green of the garden is rising. Now is the time to shake some iron posphate onto the garden beds, while the slugs and snails are looking for food.


Killing Slugs and Snails with Iron Phosphate:


Going Green to Keep the Green


by Gary Pilarchik LCSW-C


To learn more about vegetable gardening visit my blog The Rusted Vegetable Garden


Metaldehyde versus Iron Phosphate:


Metaldehyde works by dehydrating its victims. The problem is that it is toxic to all that consume it. It is deadly to snails and slugs but also can be deadly to birds, frogs, and pets. It has been on the market since the 1930’s and it does work. The question is, do you want to kill or harm things that might also help you manage the snail and slugs? Birds and amphibians are great natural enemies to the slimy guys.


Iron phosphate occurs naturally in the soil. So, when the bait breaks down, only iron phosphate returns to the soil. That is a good start for considering iron phosphate for slug and snail control. Going green to keep the green. Now, this doesn't mean you can eat iron phosphate and nothing will happen. Treat it as a poison and take precautions. It is significanlty less toxic then metaldehyde. Green doesn't mean harmless.


Iron phosphate is ingested by the slug. It comes in granular form, wrapped in a very tasty bait or so I am told. Slugs and snails eat the tasty bait and ingest the iron phosphate. It basically works by disrupting their digestive process. They stop feeding and crawl off and die in a 3-6 days.


Iron phosphate can be found at local home improvement centers for $4.99 to $7.99 a shaker can. It is also easily found on-line. The baits have rice like but more cylindrical shape. The can has a shaker top that can be adjusted. Just shake and wait for the slugs to find the bait.


When and How to Use Iron Phosphate:


Spring! Spring! Spring! is the time to start the endless war on slugs and snails. The eggs will be hatching soon, the little guys will be hungry, the adults will be hungry and your garden greens are just starting to grow toward maturity.


Get the iron phosphate onto your garden now. It is best used SHAKEN and not PILED. Do not make piles. Slugs and snail move slowly. You want to scatter the baited iron phosphate all over your garden surface. This method is on the product directions but I want to stress, not piling it. Scatter it so there is more chance of the bait, sitting in the paths of the snails and slugs.


The iron phosphate pellets can last 1 – 2 weeks even in the rain. Now if you have crazy rain, then you will have to go out and re-bait your garden. I suggest baiting, just when the green is coming up. Hostas should be poking up. Daffodils should be in bloom. The lettuces and greens in your garden should be up and a few weeks from maturity. This is the same time the slug and snail life cycles become active. Get the bait out now to disrupt their cycle. Given them some food that will kill them.


In my area of Maryland, I hit the slugs and snails in mid April with the iron phosphate. I will hit them again the first week of May and again in the last week of May. This should kill a lot of adult slugs and baby slugs. You are trying to decrease their numbers when they emerge. Get the bait out there while there is less food available.


After the first wave of attack, you can sprinkle the bait 1x a month. Try and do it when you will have 7 days of dry weather. In June, July, and August your garden gets one application during a 7 day sunny stretch. This second wave of attack is aimed at getting as many as you can.


Come September the snails and slugs will be laying eggs and getting ready to repeat their cycles of life. Sprinkle the bait September 1st and September 15th and you should have effectively disrupted the cycle of snails and slugs in your garden without targeting or harming the beneficial insects and predators.


Good Luck!

Plaques and Signs to Stylize Your Garden Space

Address signs and address plaques are a great way to create character for your house. But did you know you can create gate signs, garden plaques and add other items to your garden that create a one of a kind space. I call my garden The Rusted Garden for one reason. This year I am looking to add some character to the entrance way. I found a site that has everything from bird baths to unique garden hose holders.They have so many things you can't find in a store.

What is that one reason for my garden's name? If you are interested in a house address plaque or a welcome plague or speciality plaque, you can find them all at Mailbox and Beyond. My garden is full of rusting items; old spades, old saws, broken rakes and even and old fire pit. The rust is character. In my mind anyway. The items are memories. Take a look at one  address plaque to see how the can vary in uniqueness. You'll find plaque and sign categories for just about anything to help you customize your house and garden. Maybe you don't have a garden... but imagine what a great gift a stylized sign would make for the gardener in your life.

Monday, January 30, 2012

How the Jan 4th Herbs Are Doing and A Strange Mushroom

Great!  You saw the parsley. Here are the rest. Looks like I will be transplanting all weekend.  A bonus mushroom too.


A Mushroom in a Herb Flat: Gary Pilarchik

Nothing in sterile, unless you buy heat pasteurized starting mix and soil. You are always bringing something from somewhere to yourwhere.  The above mushroom just sprouted 26 days in and lasted 2 days. Also notice how tall the thyme has grown. It is about ready for transplanting along with the parsley.


About 28 Days of Growth Chives and Thyme: Gary Pilarchik
Bottom Left is Oregano and More Thyme: Gary Pilarchik
A Flat of Chives, Thyme and Oregano: Gary Pilarchik

How to Plant Onions in a Raised Bed Garden (One Method)

I am sending my Google Knols to my blog for storage since they are closing that service.

I like to use raised beds. They warm a bit quicker, allow you to grow more vegetables, and allow you to concentrate resources. Onions can be grown from seed, bulbs, and bunches. I prefer to purchase and plant onion bunches. Here is a method to get them into your raised bed quickly and easily. This method of planting is designed to allow the onion to reach full maturity.


Planting Onion Bunches in a Raised Bed Garden

By Gary Pilarchik LCSW-C
 
For daily updates on gardening visit my blog The Rusted Vegetable Garden


Purchase Your Onion Bunch:

I like to plant onions from bunches. An onion bunch will cost about $3.50. I am planting red and white onions. You will get about 40 to 50 onions per bunch. I prefer bunches because they are easy to plant and visually stand out in the garden so I can see where they are growing. Believe it or not it is easy to forget where things are at times when you plant. The best places to go for onion bunches are your garden centers and home improvement centers.


Planting Your Onion Bunch (In Pictures)

A picture is worth a thousand words. I will keep the writing to a minimum and show you the process. This type of planting is designed to allow the onions to grow to full maturity.


Prepare The Onions For Planting


Red and White onion bunches.


Soak them for 15-30 minutes. It makes pulling them apart easier.

And it prepares the roots for planting.


Select the Site and Sort the Onions

The planting area is visible and it is about 12-15 inches wide.

The whole bed has been amended with peat moss and composted humus.


Separate the onions into large and small piles. I will be using
the large onions for this Knol planting. They will grow to full maturity.


Amend the Immediate Planting Area with Compost


Even though the entire 4x8 bed was amended, the onion planting area
gets more done to it. I dug out a 12 inch wide area that is about few inches deep.
The length of the row depends on how many onions you are planting. 


The area was filled with composted manure and humus.

I mixed it into the top 4-6 inches of soil. You want loose soil.

This is to allow the onion bulb easy expansion during growth.


Plant the Onions about 2 inches Deep


Poke holes about 2 inches deeps with your finger. I spaced them about 3 inches apart

in groups of three. You harvest the middle row first to let the others grow.

Plant them to a depth a bit below my finger tips (above).


Give them a little tug up to settle air pockets and water them well.

Plant them this way if you want larger full grown onions.


Harvesting Your Onions

 
A couple of things to remember is that you want the soil to be very loose so the onion can expand to full maturity. I planted them in lines of 3 the length of my row. If you harvest the middle row first, it opens space. If you the harvest every other onion left in the other rows, it opens up space. By planting and harvesting this way, you can get a lot of onions to your table. The early onions are smaller but can be used the same way as the onion left to grow larger.


My Other Gardening Knols

Join My Garden Blog:The Rusted Garden
 
Sometimes the links below, by title, are defunct for unknown reasons.
Here is a main link, if one below is not active. This link is always active My Gardening Knols Direct Link 


House Husband

House husband
Written by Sonny Quinn

I never thought that I would be the one to work full time and my husband be the one to stay home and raise our children. I am an attorney and used to just do a little pro bono work and stay home with our children the rest of the time. My husband had a very high profile corporate job, and we really did not have to worry about money. Then came the recession, and my husband lost his job. Well sometimes things happen to change your life that you have no control over. That is when I had to put on my big girl panties and go out and get a job to bring home the bacon. It took a while for my husband to get the hang of what to do with our young children all day. I think they watched a lot of children’s programs like Sesame Street on direct tv san antonio to pass the time away. Now he has gotten better at getting them on a schedule for meals and naps. He has even figured out how to grocery shop with the kids in tow. I think I could get used to this arrangement.

Sunday, January 29, 2012

Indoor Herb Progress with Parsley Transplants

No that's not a new abstract deconstruction of some over priced restaurant dish. It is those herb seeds I planted back on January 2nd. Parsley is growing the fastest and will need to be transplanted over the next week.  I am going to use the clear storage containers right away and move them in and of the backyard.

The parsley is green. Seems like the flash changed the color of the parsley quite a bit. I wanted to note the reason we started a lot of the perennial herbs indoors so early is because they are slow to germinate. Next to the parsley are rosemary and lavender also planted on January 2nd. Although some germinated after 2 weeks, a few more just came up last week. They germinate and grow slowly. You want to start these 2 herbs indoors really early. Okay back to the parsley.


Lavender and Rosemary: Gary Pilarchik
22 Days of Parsley Growing under Lights: Gary Pilarchik

The parsley had no problems growing under grow lights and I probably should have started them now versus three weeks ago but... I have an excuse to try out my greenhouse container idea.


Parsley Transplants to Be: Gary Pilarchik

You might notice the plug on the left is light and dry. The reason you want to start transplanting your herbs when they get to this size is because they will dry out quickly. I over plant my cells and divide. It works. You can go with 1 or 2 seeds per cell and grow them larger before transplanting.

I broke the plugs up into pieces making sure I get a good number of plants in each clump. They all won't survive but that is fine. At least one will survive per cup and give you a plant for the garden. Honestly, you probably will have the chance to divide them again. Parsley is a bit picky with root disturbance when they get older, so be careful.


Dividing Parsley for Transplanting: Gary Pilarchik

I ended up with 5 clumps of parsley from 2 plugs. I typically transplant them into plastic pots or cups. I do not use peat pots. They are an absolute fail unless you are in a full greenhouse or using them outdoors. Indoors... they grow algae, wick water away and dry out too fast and decompose.  I may not be pure green but as I say go green where you can.


Transplanting Parsley/Root Space: Gary Pilarchik

Some plants need more care with their roots. Parsley is one of them. Make sure you make a hole big enough for the roots to extend down into the mix. Fill in around them and make sure the roots aren't clumped up. I believe parsley creates a tap type root.


Parsley in Transplant Pots: Gary Pilarchik

I ended up with what you see from 2 plugs. There are 27 cells of parsley in the seed trays I planted. What starts out as small seeds can soon take over you home. I will have over 60 parsley plants to sell, give away and plant. And because I over seed... I could probably divide them further. The plants will go into the containers and get moved up and down those steps in the background. 

60 parsley plants? What was I thinking? Really... what was I thinking? I guess a parsley oven dehydration blog will show up in the Summer.


Parsley Transplants in a Storage Container?: Gary Pilarchik

Friday, January 27, 2012

KNOL: How to Start Seeds in Seed Trays Indoors (In Pictures)

Transfered here for storage from my Google Knol articles.

You can save a lot of money by starting your own vegetables, herbs, and flowers indoors in seed trays. The seed trays range from $3-$5 for a flat. The seed starting medium cost $4-$5 and is enough for 3 flats. The seeds cost $1-$3 a pack. It doesn't cost much to get started and you can re-use your seed trays and cells, year after year. Give it a try!

How to Start Vegetable Seeds in Seed Trays (In Pictures)

By Gary Pilarchik LCSW-C
 
 
Visit my blog for updated information about gardening: The Rusted Vegetable Garden


Seed Starting Indoors: The Supplies

Starting seeds indoors is easy, very easy. It will save you quite a bit of money and it allows you to germinate plants you might not find in your local area.


Seed Starting Mix

You need to buy seed starting mix. It is inexpensive. It is sterile.  I bought a bag made by Miracle Grow. You can see the packages states exactly what your need: seed starting potting mix. I think the cost for the mix was $4.99
 
You can make it yourself if you choose. If you make it yourself you should follow 1 part peat moss: 1 part vermiculite: 1 part perlite. You can exclude 1 of the latter two. You would also need to put lime in the mix to manage the ph of the peat moss. I used to make it. Now I just buy it on sale. It is much easier to buy it. 
 

Seed Starting Tray and Cells

You also need a seed starting tray. You can buy one set. A set inlcudes the black flat tray, the 72 cell insert that goes in the tray, and a clear plastic tray top. I don't use the plastic top. My tray is sitting in the plastic top, in the picture below.  I buy my tray sets in a package of 3 and a 3 package set costs about $8 at Loews.


Fill the Seed Cells with Starting Mix

Fill the tray with seed starting mix. And this is important, pack each cell of mix down with your thumb and refill. You want to make sure the mix is nicely packed in each cell. I you don't, your seeds can drop to the bottom. I prefer to have a lot of seed starting mix in each cell because I over plant my cells. If this is your first time planting in cells, only put 1-3 seeds per cell and follow the package instructions.


Seed Starting Indoors: Buy the Seeds You Want to Grow

Next pick out what you want grow. If you read the back of the seeds it tells you when to plant them indoors. It will also tell you if you can plant them in seed trays. Radishes for instance should always be planted straight in the garden. For instance, tomato packs will tell you to start the seed indoors 6-8 weeks before the last frost date in your area. I live in Maryland which is zone 7. Zone 7 means I can typically plant tomatoes outdoors May 1st. Using that date, I would start my tomatoes and other seeds that need 6-8 weeks to grow between March 1st and March 15th. If you do an internet search for gardening zones, you can find your area.
 

Why Did I Pick Lettuces and Basil?

Greens are cool weather crops and they grow quickly. Cool weather crops can go in the garden and handle cold nights. They can even handle some frost. Lettuce, Kale, and Collards are cool weather crops. I grow them in indoor, and transplant them directly to the garden in late March, and in April.
 
Basil, is colored green but it is not a cool weather crop. In needs heat. It is an herb and all herbs can be started indoors quite early. Basil is expensive to buy as a transplant. Using this method, 1 pack of seed will easily plant 18 cells. Basil cost about $2 - $4 a plant if you buy them at a nursery. For $2.00 you can get 18 plants. That is quite a bit of savings.


Starting Seeds Indoors: How Deep Do I Plant the Seeds?

You can follow the instructions exactly as the pack states for planting depth. I find you can plant most seeds 1/4 inch down. You don't need to stress over the difference between 1/8 and 1/4. They grow. The only ones you don't want to bury are seeds that have instructions to press them on the surface or lightly cover.
 
I am mixing three packs of large sweet green leaf basil together and putting (yes) 10+ seeds in each cell.  Why? They will grow just fine and like water. If I keep the cells moist, the basil and lettuce will grow well. Once the plants are large enough, I divide them up. Lettuce and basil are easy to divide. You can gently break the clumps of starting soil apart and divide them 1 plant at a time if you want. Not all plants  divide that easily. If you enlarge the photo, you can see the cells are over planted with seeds. Remember nature doesn't drop seeds one inch apart. Those are basil seeds in my hand. The seed packs will tell you the recommended number of seeds to plant.


It is hard to tell put you can see 5 lettuce seeds scattered on the cells below.  Again, the seed pack will tell you how many to plant. From experience I know I can easily divide lettuce. I put in 5 or more seeds.


Once the seeds are in on the soil, I use a popsicle stick to mix them down to about 1/4 of an inch and then press the soil down with my thumb. This ensures good soil to seed contact for germination.


Each group of 9 cells gets labelled with a stick. Below I planted foxglove. Flower seeds can be started indoors too. In my hand there is probably 500 seeds. They all wont germinate. But they will be planted heavily in the cells. I just break them into bunches when I transplant them into cups. I break them again when the get bigger. And then 1 more time before they go into the ground. Foxglove is lightly covered with soil. Just drop a little mix on them and press it down with your thumb. This process works for foxglove, in the case of flowers, follow the seed pack directions.


Starting Seeds Indoors: Watering

Never water from the top. Never... no never. Don't do it. It is too labor intensive. It will wash mix and seeds out of the cell and it will cause damping off, a fungus disease. Water from the bottom. Fill the tray up nearly halfway with warm water. Make sure the tray is on a level surface. In about 2-3 hours your starting mix will  absorb the water. You are good to go on watering now for 7 days. When the cells look dry...fill from the bottom. Dump out excess water if you get carried away. At this point you can put the clear plastic dome on your plants. Only keep it on until the seeds germinate and then remove it. Too much humidity can cause disease.


Starting Seeds Indoors: Warmth and Light

 
You seeds need to sit around 65 degrees or more. Typically a house regulates that temperature for you. If you are growing them in a basement or garage, you may need to purchase a seed heating mat.
 
Light is a bigger issue then temperature. I use growing lights. You can see them below. If you want to use growing lights, you can read about setting them up at my blog or on the internet. The seed trays should go to a south facing window. This is the window that gets full afternoon sun. Your plants can make it on 6 hours of direct light but they might get leggy. That means the are growing extra tall to find light. If you can find a window that gets 8 hours of light or more, you plants will grow more as the were meant to be: stocky, firm, and leafy. You can always move them from window to window if you have the time.


Starting seeds indoors is really easy. Give it a try. I do use a growing station. The light stay on 12 hours.
Here are some pictures of seeds I started about a month ago.


KNOL: Building Indoor Grow Lights for Seed Starting (In Pictures)

Transfered for storage from Google Knols.

Growing vegetables and flowers indoors is not difficult. You need space and light. You can create your own growing station by using standard fluorescent fictures purchased at any home improvement store. You can use the fluorescent bulbs sold in these stores. There is no need to pay top dollar for grow lights systems or special grow light bulbs. For under $75, you can get a station set up.

Building Indoor Grow Lights for Seed Starting (In Pictures)

By Gary Pilarchik LCSW-C
 
Visit my blog for new gardening ideas at The Rusted Vegetable Garden
 
Every gardener desires more space. I recently had my basement finished, did the drywall myself, and had a grow-light closet built. It was under my stairs before construction and I had quite a bit of room. Though demoted to a closet, I love it. I needed to build a third level of lights. After transplanting my plants, as always, I have a ton of plants and the warm weather is late. This Knol shows you how to build a basic and highly functional grow station. It is very easy to build.

Step One: Select A Space

This is how my closet looked before I started the third level of lights. There are two levels below it.  I use foil to reflect light back into the seed trays. The third level is going in that empty space.
 
You need to select a space and build a shelf like I did below or put in an old table. Once you identify the location of you grow station you need a place where you seed trays will sit. Anything works. People even buy the plastic shelving units at home improvement centers for their grow stations.


Step Two: Secure Boards For the Fluorescent Light Fixtures

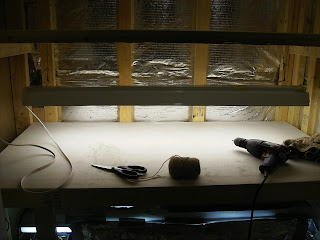
I added four boards as seen below. The two boards in the middle will support lights and the others will support the drywall surface top. Now drywall isn't the best choice because it can get water damaged if there is a whole lot of excess water. Why did I use it? I have a lot left over from finishing my basement. The timbers are left over too. How you space the levels is up to you. You want enough space to work.
 
In this space I will need two fluorescent fixtures to light the whole area. If you are building your station on a shelving unit or on a table that is 1/2 the size of the space I am using, you will only need to hang one fluorescent fixture. If you use a shelving unit, you will attach your lights to the shelf above it. The distantance between my lights is 12 to 15 inches. I can adjust them if needed.


Step Three: Buying the Fluorescent Light Fixtures

That is the basic fixture I use. It is from a home improvement center. The fixture does not come with tubes and it is inexpensive. I purchased the brightest basic fluorescent tubes in the same store. They also weren't expensive and I DON'T recommend buying tubes that are for growing plants. You know why? You just get charged double or triple for the same tubes. Just by the brightest lumen output basic fluorescent tube out there. I've done it that way for years. I have only replaced two tubes so far.


Step Four: Hanging the Fluorescent Lights

One fixture goes on the back middle timber. It is supported by tomato jute/string. I put loops on the end of the jute and can easily adjust the light height by attaching different loop levels to the hook in the fixture. Most of the lights come with chains and hooks. I seemed to have misplaced mine. You will be able to move your fixture up and down as the plants grow. Here is a basic distance for the light to the plants.
 
2-4 inches before the seeds germinate
4-6 inches just after a week of plant growth
6 inches or more as the plants grow larger
 
You typically want about 2 inches between the plant and the bulb based on my experience.


The next light goes in the front middle timber. This space requires two lights. The variance in brightness is due some to the bulbs but mostly to me using or not using the flash on my camera. I am a gardener, not a photographer.


Step FIve: Use Foil to Reflect Light Back In

I put foil down with the reflective side up. My seed trays will get pushed back and the area in foil won't be fully covered by the trays. I want the light to be bounced up and around. You can also see a foil flap way in the back and on the right side. Anywhere the light goes, redirect it back to the plants with foil. Please use the reflective side. There are two fixtures in the picture below. You just can't see the one behind it.


I also have a front flap of foil attached. The growing area is now nicely wrapped in foil, mostly for maximizing light but it does help with warmth a bit too. You can see how bright the seed growing station is. It provides plenty of light without the expensvie cost of grow stations.


Step Six: Various Levels of Growing Lights/Timers

The upgraded closet. I put a new shelf on the top too, to store my supplies. You can see different stages of plant growth. The bottom has seedlings in cups. The 2nd level has trays with seedling up and about and the third level is holding my tomatoes I just started a few days ago. You can start all your vegetable and flowers seeds indoors by building a basic system like this. It works. You don't need anything fancy.
 
I also recommend getting some light timers. It saves you the hassle of having to turn the station on and off. I typically set my timers for 10-12 hours. You can set it and forget it. You will also need some extension cords. The fluorescent lights come with 3 prongs on their plugs. You need adapters or cords the accommodate the plugs. Good Luck!


Your First Garden: A Challenge to You - STEP TWO

The first step was to find a 4x4 space in your yard or at a friend's house. I gave you 5 days and that was about 12 days ago. So... no excuses you had extra time.

I found myself a 4x4 plot.

STEP TWO: (14 days to Complete)

For a 4x4 spot you need to go and buy 6 bags of the most inexpensive garden soil you can find. The bag should say Garden Soil or Premium Top Soil. Try not to buy the cheap $1.25 bags of just Top Soil. However, 6 bags of anything will work. The bags can be any size. Simplicity is the key. You also need to get a large Bail of Peat Moss. The size should be 3 cubic feet.

The cost for 6 garden bags of soil will vary based on what you buy but you should find them for $3-$6 a bag. There is no need to pay more. The peat moss will cost $10 to $15 for 3 cubic feet.

You can by them all at once or over time. You have 2 weeks to get them. When you buy them lay them UNopened on the 4x4 plot. Cover as much space as you can. Let them kill out the grass and weeds in your future garden.

This is the hardest part. Once you purchase and put the bags out, you will be compelled to open them and turn the ground.

You can find the whole Chain of Steps for the Challenge here: Your First Garden

Thursday, January 26, 2012

KNOL: Building a Low Cost Vegetable Trellis in Pictures

Transfered from Google Knols for storage. They are discontinuing the service.

Expand Your Vegetable Garden Upward: Beans, Cucumbers, Squashes, and Small Melons

A vegetable trellis will give you more gardening space. Take the vine crops upward and off the ground. Not only will you have more growing space but you also create a healthier garden. The trellis will lift vines and provide the garden with more air circulation and better disease management. This trellis can be built for $10 and only takes about 20 minutes to complete.

Building A Low Cost Vegetable Garden Trellis: In Pictures

Expand Your Vegetable Garden Upward: Beans, Cucumbers, Squashes, and Small Melons
By Gary Pilarchik LCSW-C
 
For more gardening ideas visit my blog The Rusted Vegetable Garden


Why Build a Vegetable Trellis?

A vegetable trellis will give you more room in your garden to grow vegetables. Vine crops will grow up the trellis and not take up space sprawling on the ground. The trellis also creates a shade area. If you garden in a hot zone, you can now create a micro-climiate for cool weather crops beneath the shade of the trellis. Essentially, you can extend the season for crops such as lettuces. The shaded cooler area will slow plant bolting. One way to get diseases in your garden is to have little air circulation and sprawling vines. The trellis allows more air movement in your garden and this benefit helps to quickly dries the leaves of the vines. The trellis aids in creating two good conditions that help prevent diseases and the spread of diseases.


The Trellis Materials

I bought these at a home improvement store. A bag of six - 6 foot bamboo canes at $2.97 a bag. The chicken wire measures 24 inches by 10 feet and it cost $7.00. A trellis is an inexpensive way to increase space in your garden.
 
 
The Supplies


Unroll the Chicken Wire, Walk on It, and Bend It in Half

Unroll the chicken wire and walk on it. Chicken wire wants to roll back up and it can be difficult to handle with just your hands. The best way to handle it is with your feet and hands. Once it is unrolled, fold it over to create two five foot sections. Make sure you walk on the crease of the fold and firm it down.
 
 
Rolling Out the Chicken Wire


10 Feet of Chicken Wire


Fold it in Half to 5 Feet and Step on the Crease


Weave the Six Foot Bamboo Poles Up the Sides

Follow the picture below and use four bamboo poles to weave up the sides of the chicken wire. Insert the pole, starting at the bottom, and weave the pole through every 5th or 6th hole. It does not need to be exact. Leave about 2 inches of bamboo pole on top of the trellis and leave the rest of the length on the bottom. The excess pole length is what gets inserted into the garden earth.


Weave a Bamboo Pole Up Each 5 Foot Side (Like Every 5th Hole)


Two Poles In


Four Poles In: Notice the Bottom Pole Length


Insert the Trellis Into the Garden

It is important to leave several inches of pole at the bottom of the trellis (see above picture). That is what you will insert into the ground to anchor your trellis to the garden bed. The trellis can be opened to any length but I recommend a minimum of a 3 foot opening in the base of the trellis. Tie the tops of the poles off as pictured below.

Placed in the Garden


Tie Off the Tops for Added Support


Plant Your Vine Crops at the Base

You can plant your vine crops on the inside or outside of the trellis. Make sure you position your trellis in a way that it is easy for you to reach in and pick the vegetables. You can grow anything you wish as long as the single fruits stay under 2 pounds. If you grow heavier crops you will have to figure out a way to support the heavier fruit. A nice shade area will be created beneath the trellis. You can plant lettuce, spinach, radishes, or other vegetables that prefer cooler temperatures. The shade slows down the bolting process.


I Planted Small Melons 


My Other Gardening Knols

 
Join My Garden Blog:The Rusted Garden
 
Sometimes the links below, by title, are defunct for unknown reasons.
Here is a main link, if one below is not active. This link is always active My Gardening Knols Direct Link 


My Gardening Recipe Knols


Tuesday, January 24, 2012

HELP! ?'s translates to Help with Items on My Blog, Gardening Emergencies or...

If you need help with something on my blog like seed ordering, have a garden emergency like a dieing plant, are perplexed or maybe just need some guidance... ask ASAP. Answers are really welcomed here for garden problems and emergencies.

Seed Starting ?'s translates to Questions About Starting Seeds Indoors and Outdoors

Gardening is not as easy as putting a seed in the ground and is not as complex as an automated hydroponic system. If you have a question on planting seeds, transplants, seed starting indoors or anything to help you get growing then by all means ask the questions. Answer are welcome too!

Planting & Growing ?'s translates to Anything About Gardening

If you have questions about dirt, raised beds, planting times, planting methods,  pests, diseases, projects or anything about planting, growing, harvesting and cooking vegetables.... ah just leave a question. And please give an answer.

Ask Me and The Readers Question About Anything Vegetable Gardening

I have some answers and like to make up answers but don't have all the answers to gardening.

What I like about blogging is that I learn new things every week. If you have any questions about anything related to gardening please post it here. I will give my two cents and possibly move it to its own blog entry for all of us to mull over and see what we can do to help.

Thanks!

NO QUESTION is a bad question. Learning is good!

Please Post Pictures of Your Garden and Related! We Want to See.

Gardening is a worldwide affair. Please share your garden pictures with everyone that visits the Rusted Vegetable Garden. I would love to see what you grow, what you create and anything else related to gardening. I really want to see the gardens and produce of gardeners from around the globe. THANKS! So.... post away.

Who R You? translates to Introduce Yourself

Please use the reply section to introduce yourself and let us know what your garden is like. Feel free to leave links to your blogs or spaces. As always, I will remove what should be tossed on the compost bin.

Starting Your Perennial Flowers and Herbs Indoors: Light Germination Needed

I just wanted to put a blog out there to remind you that you can start flowers indoors. Flowers make a great addition to your vegetable beds. They attract beneficial insects, look great and can even be edible.  I started flowers and additional herbs in flats, about a week ago. They are sprouting as I type.


Flowers and Herbs to Start Indoors: Gary Pilarchik


I decided to start tarragon, sage, fennel and cumin. Starting seeds indoors does become an addiction. You have to constantly remind yourself they get LARGE! I never grew cumin before. I am also starting my Rudbeckias and Shasta Daisies. 


The principles for starting the above seeds indoors is the same as my recent blog. I wanted to show you something a bit more interesting and that is Coleus and Snapdragons. They aren't perennials but do take a long time to germinate and grow. They are great for starting indoors.  What makes them interesting?


Coleus and Snapdragons: Gary Pilarchik

What is interesting about these plants is that they NEED LIGHT to germinate. The preparation is a little bit different. You want to fill you cells up and pack them down firmly to the point the seeds won't fall beneath the starting mix. Starting mix is very porous. These seeds are small so the soil has to be packed tightly.

I always start these seeds after my other plants have germinated and the grow light get turned on for 10-12 hours.


Snapdragons Need Light to Germinate: Gary Pilarchik
Coleus Seeds Need Light to Germinate: Gary Pilarchik

The Snapdragon and Coleus seeds get pressed on the surface of the soil. It is important you provide them with a firm soil mix base in your cells. They need to sit on the mix and get direct light. Don't mix them under the starting mix.


Seed Cells with Firmed Down Starting Mix: Gary Pilarchik

The seed are small and you want to put 5 to 10 seeds in each cell. The Coleus don't divide that well but the Snapdragons are pretty hardy for dividing. You can go with a few seeds to a cell if you prefer but as I say all the time, I tend to over seed and prefer to divide them.