FB HEADER

Search The Rusted Garden Journal: Just Enter a Key Word or Phrase

Friday, July 28, 2023

5 things You Can Do to Beat the Summer Heat in Your Garden: How to Help Tomato Plants Manage High Temperatures

When temperature get into the mid to upper 90's and 100's, most plants become stressed by the heat and shut down in some way. They do this to manage the high temperatures. One or two days of elevated temperatures is not typically a point of concern. However, when elevated temperatures are coming to a garden for more than four days at a time, a gardener should address this common problem.

There are several things you can do to help your plants manage and beat the summer heat. I will be focusing on tomatoes but this holds true for most summer crops. These steps can help plants continue to produce and limit the amount of damage that occurs from prolonged high temperatures. 


Tomato Leaf Damage from High Temperatures


Number One:
Increase watering to every other day. When temperatures get into the upper 90's and 100', watering every day maybe needed. For containers, with large plants, water them every day when temperatures are in the 90's or higher. Container plant may even need to be watered twice a day. Lack of water is the number one cause for the yellowing and die off on lower tomato leaves. 

I water my tomatoes plants for 10=15 seconds at the base for a deep soaking and around the base of the plant to water in the extended surface roots.


Soak the Base and Surrounding Surface Roots

   
Number Two:
The summer heat often damages leaves. Give the plants a light drink of any water soluble fertilizer. They will appreciated the nitrogen to help with future leaf growth. Use organic fertilizers at full dose but cut chemical fertilizers to 1/2 dose. The latter tends to go over board with nitrogen. Tomato plants often lose lower leaves to yellow and browning. This is a normal response to high temperatures and water issues. You don't have to worry about excess nitrogen with a light feeding.

Number Three:
Mulch the base of your plants with 1-2 inches of grass clipping from untreated lawns or use other types of mulch. This helps keeps the soil temperature cooler and it conserves water. Many plants, like tomatoes, are sensitive to soil temperatures and use that information to manage drought conditions. They will shut down production when soil temperatures remain elevated. Mulching also protects surface roots from drying out and dying off.


Mulch to Keep Surface Roots Moist


Number Four:
Pick all ripe tomatoes and nearly ripe tomatoes and let them finish indoors. Removing fruit from plants helps them manage the heat. Remove cucumber, peppers, tomatoes, beans, and other mature or nearly mature fruit. The plants will not have to worry about supporting maturing fruit and can use resources elsewhere.


Pick Fruit Often and Early During High Heat


Number Five:
Shade cloth is a summer heat game changer. I recommend 50% shade cloth as a general guide or 70% shade cloth for gardens that regularly see temperatures in the 100's.  Shade cloth cools the plant and the soil. It can greatly reduces soil temperature by up to 15 degrees. It works exactly as felt when we step into the shade on a  hot day. The plants can survive fine under shade for a couple of weeks. Enough light gets through. It helps the plants stay cooler, continue producing, and it conserves water


Shade Cloth is a Game Changer for Gardens


These are 5 things you can do to greatly reduce damage cause by prolonged high temperatures. Just about every garden plant will benefit from the application of these suggestions.

"Good Luck in Your Gardens"
Cheers!

Gary (The Rusted Garden)


Subscribe to my YouTube Channel The Rusted Garden Homestead
Over 650,000 Subscribers and Over 2000 Garden Videos Designed to Quickly Present Information!


Visit The Rusted Garden Seed and Garden Shop
for your Seeds, Starting Supplies, Fabric Pots, Neem Oil,
Peppermint and Other Oils, Calcium Nitrate and More.
The Rusted Garden Seed and Garden Shop


Thursday, July 27, 2023

Cucumber Leaf Damage Identification: How to Identify Pests, & Manage Leaf Hoppers with Peppermint Oil Spray (Recipe)

The first rule is to identify what is harming your plant. Once identified, you now know if your plants are dealing with a virus, fungus, or pest problem. Proper identification leads to selecting the right treatment. Treating pest damage with an antifungal baking soda spray, would be ineffective.

Advanced Cucumber Leaf Damage from Leaf Hoppers

Cucumber plants can be affected by all the above depending on the time of year, weather, and location of the garden. The damage to these leaves is caused by leaf hoppers. They feed on the undersides of the leaves. The damaged leaf, first appears dark green, then yellows, browns, and the leaf begins to die off significantly. They eat with the veins of the plant leaf and create very angular feeding shapes. This angular pattern sometimes fools gardeners into believing it is a fugus or virus.

Leaf Hoppers Chew Leaf Undersides

Damage Progress Changes Color

I always recommended taking notes so you know when problems show up in the garden. They most likely will return the same time every year. Leaf hoppers tend to select taller more mature cucumbers plants but will attack what is available to them. I started my spray routine late this year, as I was away on vacation for 1 week. I prefer using peppermint oil as my main treatment for smaller soft bodied insects. You can spray this mix every 2-3 days for an outbreak over 3 or 4 cycles. It irritates, repels, and kills.

Peppermint Oil Insect Irritant Spray

1-2 tablespoons of pepper mint oil per gallon of water (I recommend 2)
1-3 teaspoons of dish or detergent soap (soaps vary and too much can damage leaves)

I recommend using Castille type soap as it is pure soap and mild. When using Castille pure soaps, I use 1-2 tablespoons per gallon. 

Oil will float on water and you need soap to disperse the oil through the mix. Soap will also kill soft bodied insects. 

Spray the tops and bottoms of the leaves, shaking regularly to keep the oil mixed in the water.

You can also use rosemary oil or a combination of both. You can find these at my seed and garden shop. If you don't purchase them from me, make sure to purchase pure oil and not an extract. The oil is potent and that is what you want to manage insects.

  
At My Shop: Peppermint, Rosemary and Neem Oil

To maintain healthy plants, spraying every 7-10 days is effective. Even though this spray mix is relatively mild, always test spray new sprays in your garden and wait 24-48 hours to see if they cause leaf damage.

"Good Luck in Your Gardens"
Cheers!

Gary (The Rusted Garden)


Subscribe to my YouTube Channel The Rusted Garden Homestead
Over 650,000 Subscribers and Over 2000 Garden Videos Designed to Quickly Present Information!


Visit The Rusted Garden Seed and Garden Shop
for your Seeds, Starting Supplies, Fabric Pots, Neem Oil,
Peppermint and Other Oils, Calcium Nitrate and More.
The Rusted Garden Seed and Garden Shop


Tuesday, July 25, 2023

How to Make Mason Jar Herb & Garlic Olive Oil Tomatoes: Recipe & Guidelines

One of the best ways to use cherry tomatoes grown in your garden, is to make herb and garlic olive oil tomatoes. They have a long refrigerated shelf life. I have kept some of them refrigerated for 12 months. They are best enjoyed by taking them out when needed, and letting them come to room temperature for several hours. I leave mine out overnight. Olive oil will thicken when refrigerated and return to its natural state as it warms.

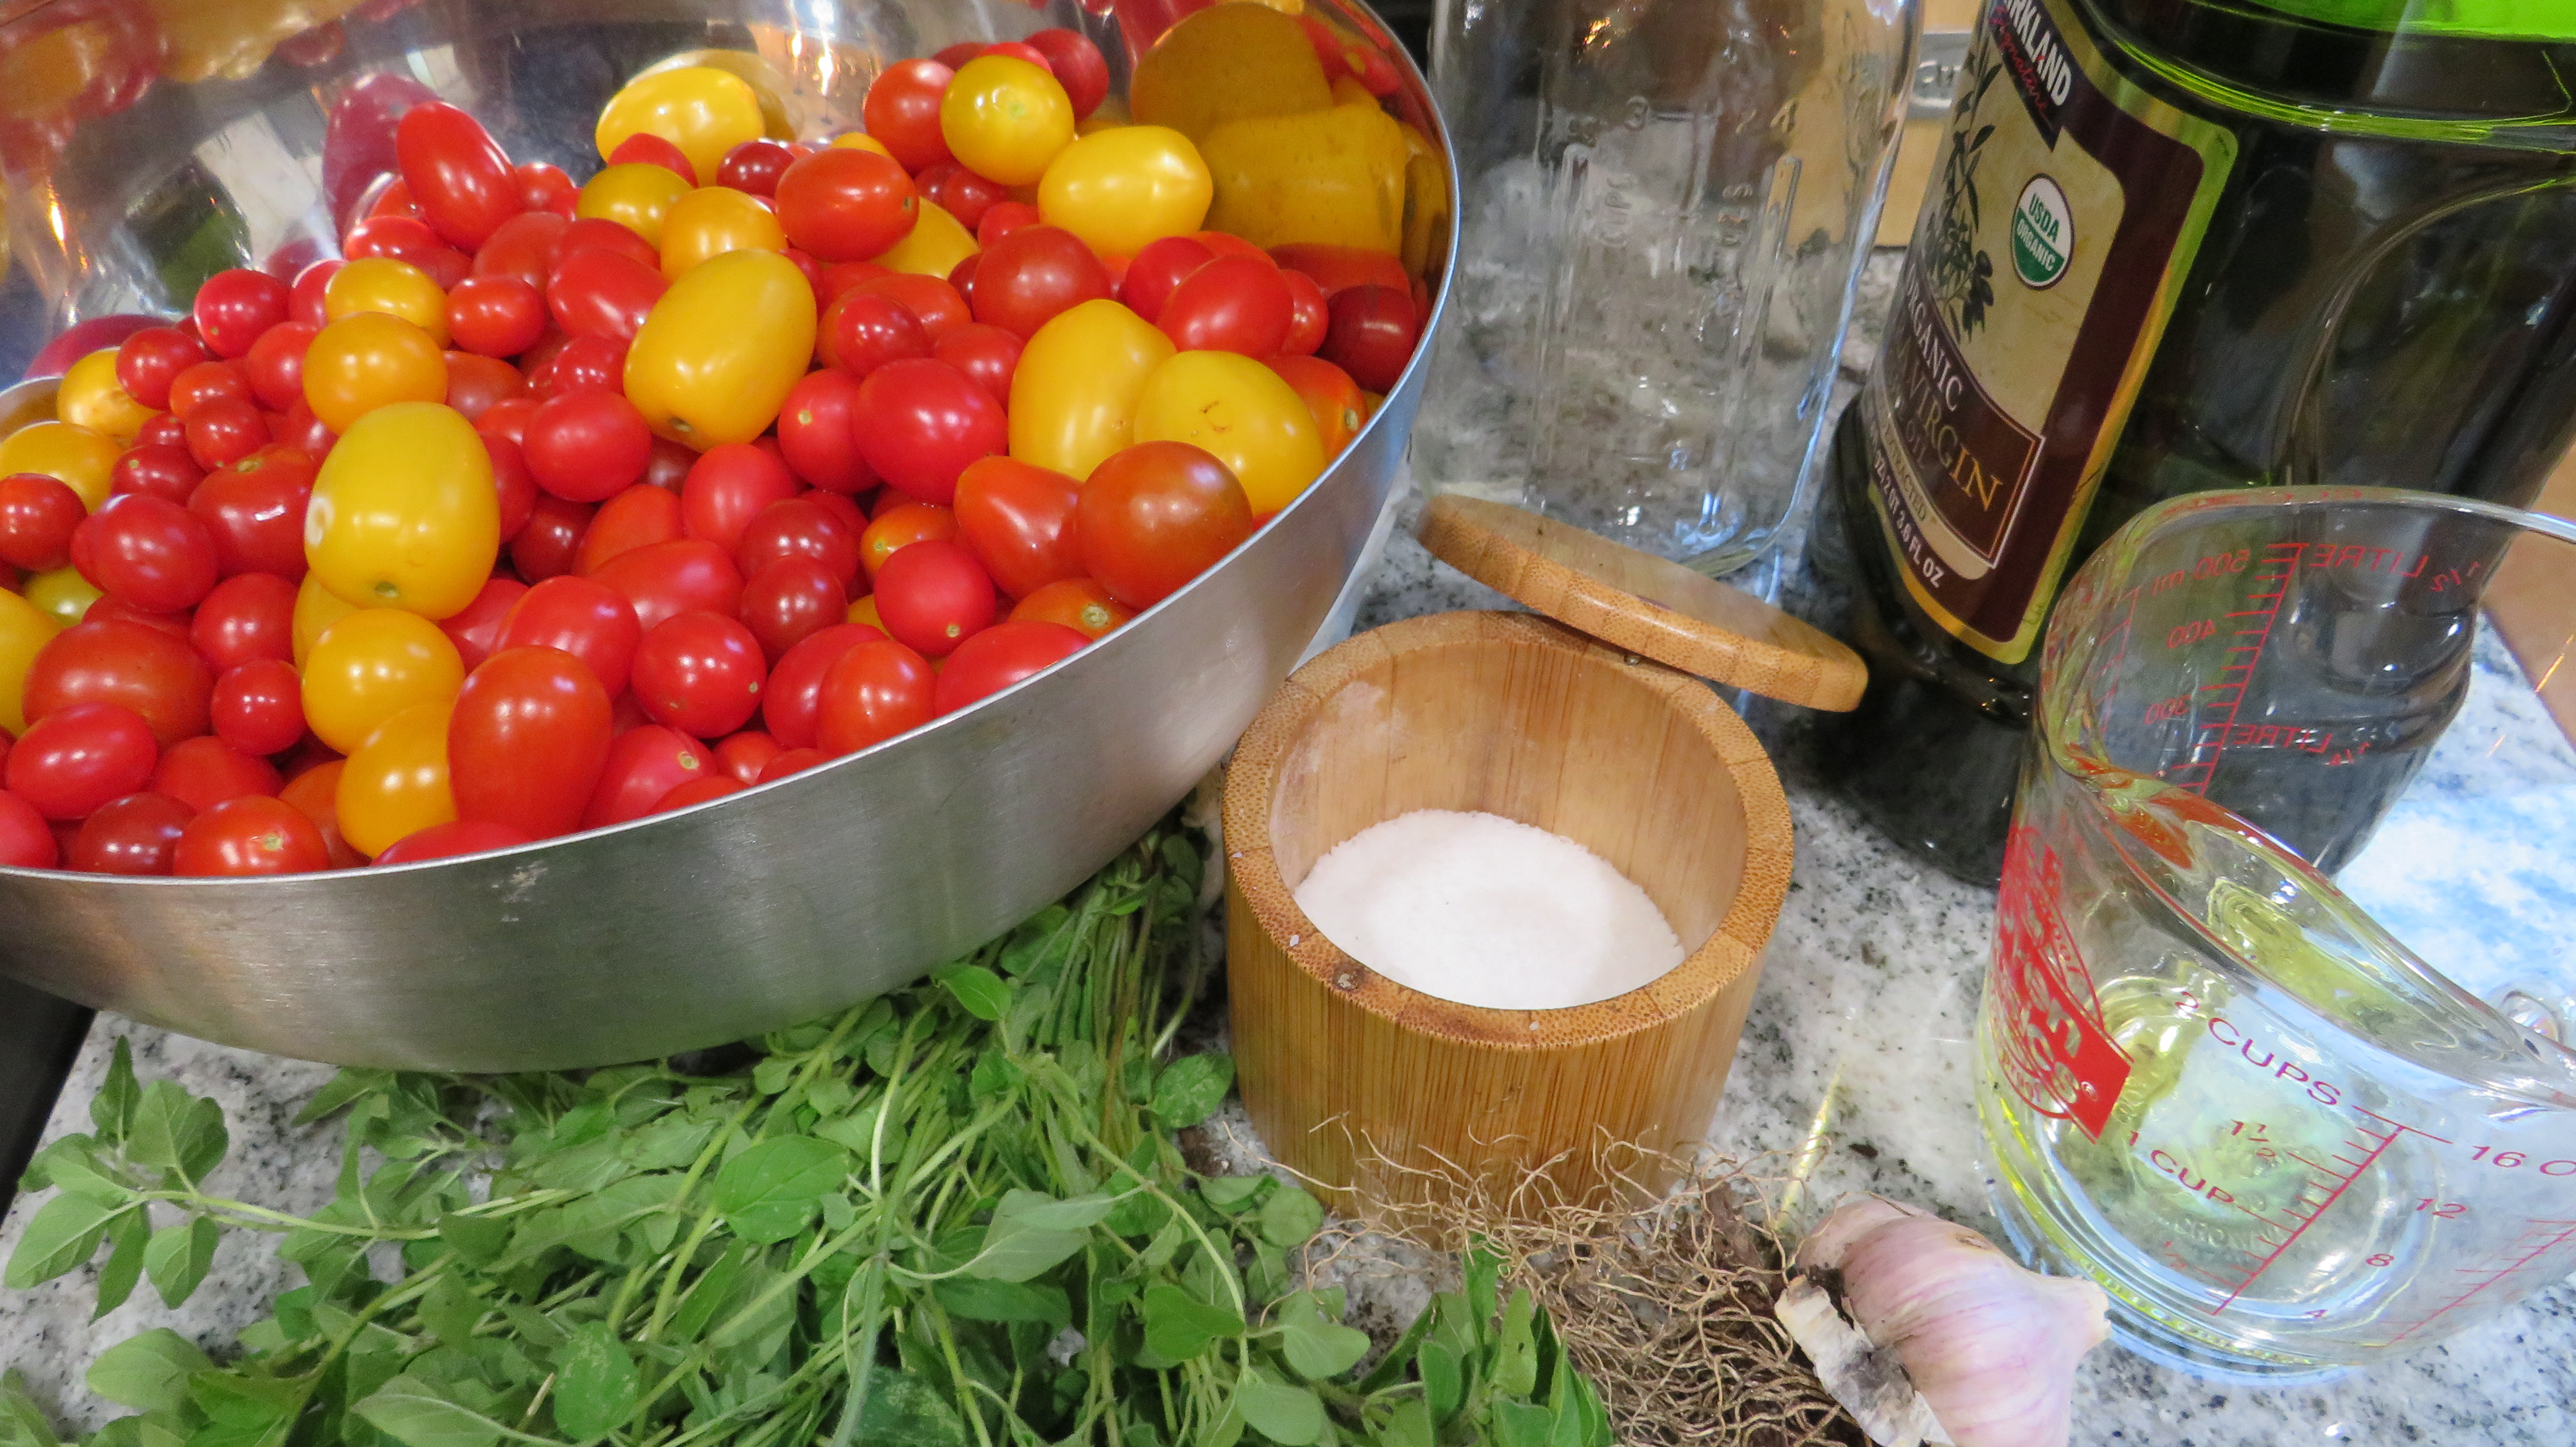
Herb & Garlic Olive Oil Tomato Ingredients

Ingredients and Such:

Mason Jars 
Cherry Tomatoes
Fresh Herbs of Your Choice (I used Oregano & Basil)
Fresh Garlic
Olive Oil
Salt
Pepper

Mason jars come in different shapes and sizes and should be washed and prepped before using. We are not canning, but using the olive oil and refrigerator to store them for many months. You will need as  many jars, as you have cherry tomatoes. The oil preserves them and this is not a fermentation.

I cut fresh oregano and basil from my garden for this batch of cherry tomatoes but you can certainly add other herbs you enjoy. The herbs go in fresh, at the end, when filling the jars. Garlic and olive oil is one of my favorite flavor combinations. Use more or less garlic to your liking. You could omit it and go heavy on the herbs if it is something you don't enjoy.

I like to use one large clove per pint container and a bit less for smaller containers. Garlic is prepared by chopping or pressing the cloves and warming it in one cup of olive oil on the stove. Heat the oil and garlic, on low, for about 15 minutes. You do not want to brown and cook the garlic. You are releasing the garlic flavor and using it when the cherry tomatoes are jarred.


One Clove of Garlic Per Mason Jar

General Prep Steps:

Mince or press the garlic
Add 1 tablespoon of salt to the minced garlic and let it sit for 10 minutes to draw out liquid
Add the minced salted garlic to 1 cup of olive oil and warm on low for 15 minutes
Half the cherry tomatoes


Minced and Warmed in 1 Cup of Olive Oil

Additional salt is added to the mason jars, when filling, but salting takes some practice to match your taste preferences. Remember you can always add more salt when opening and using them, but you can't really remove it. I add 1 or 2 teaspoons to each jar based on size. Use more or less salt, as you wish.


Cherry Tomatoes Prepped for Jarring

The deliciousness success of this recipe is allowing the salt, herbs, garlic, and olive oil to enter the tomatoes and fill them with flavor. The tomatoes should be halved or have a hole poked in them. I like having different shapes and colors in the jar. 

The next step is pretty straight forward. Put in the herb bunches and hold them in place to the side of the jar and fill loosely with tomatoes to just below the top. Do not press them in tightly. Gently shake the jar so the tomatoes settle and there is enough space left on top for adding the warmed garlic and extra salt. 

Top With Olive Oil

Once filled, add 1 or 2 tablespoons of the minced warmed garlic. I like to also add a couple additional tablespoons of just the warm olive oil to each jar. I love garlic. I also slice some garlic cloves, thinly, and put them on top. Add 1-2 teaspoons of salt to the to top of the jar, and pepper to your liking. Fill the jar slowly with additional olive oil from the bottle, not the warmed olive oil. The olive oil should fully cover the ingredients and sit just below the top of the jar. Lid and let sit. 


Jarred Herb & Garlic Olive Oil Tomatoes

I leave the herb and garlic cherry tomatoes on the counter for 1 or 2 days and turn and shake them when I walk by them. This period of time, allows the ingredients to mix and the olive oil to move into the tomatoes. After a day or so, open the lid and top the jars off with additional olive oil and refrigerate. Olive oil will thicken when refrigerated so don't be alarmed. I like to wait 2 weeks before eating them to allow time for the flavors to mix.  If you need more information here is my quick video.


"Enjoy Your Garden and Enjoying Sharing"
Cheers!

Gary (The Rusted Garden)


Subscribe to my YouTube Channel The Rusted Garden Homestead
Over 650,000 Subscribers and Over 2000 Garden Videos Designed to Quickly Present Information!


Visit The Rusted Garden Seed and Garden Shop
for your Seeds, Starting Supplies, Fabric Pots, Neem Oil,
Peppermint and Other Oils, Calcium Nitrate and More.
The Rusted Garden Seed and Garden Shop


Monday, July 24, 2023

25 Tomato Varieties that Do Well in Humidity, Heat, and are Resistant to Early Blight: I Have Grown All of These in My Garden

I have been growing tomatoes for over 25 years.  While I have down sized the numbers of varieties I now grow, I do recommend growing a couple different new varieties with each season and taking notes on the issues that appear on the plants. There have been years were I have grown 35 different varieties of cherry type, small, medium, and large fruited tomatoes. I really enjoy watching each variety grow and seeing it how is does with respect to Maryland's heat, humidity, and the fungal disease that always shows up, the main one is commonly called early blight. 

Tomatoes From My Garden

Pruning, mulching, and spraying tomato plants is good practice for managing problems. It is also good practice to know the issues that come to your gardens and to look for disease resistant plant varieties as well and varieties that do better in your growing conditions, be it colder, extremally hot, or overly humid. Mixing in new tomato varieties to your garden, each year, allows you to test them out. Keep the ones that do well and discard the ones that don't manage the conditions and diseases that come to your garden.

Here is a list of tomatoes that do better in higher humidity, heat in the 90's at times, and against early blight. I have noted tomatoes from this list that I grew in the past and that 'Have Grown Well', and noted the varieties that are yearly 'Keepers' as they just did a bit better than the others. These plants still get yellow leaves and die off when their are drought periods and when temperatures stay elevated. They may get some leaf spots on leaves but respond quickly to antifungal sprays and continue growing. Varieties that have an asterisk do extremely well in my Maryland garden.


At My Shop: Neem Oil and Pepper Mint Oil


Amish Paste
Fruit Size: Large (6 to 12 ounces)
Have Grown Well

Aunt Ruby's German Green
Fruit Size: Large (10-16 ounces)
Have Grown Well

*Arkansas Traveler
Fruit Size: Medium (4 to 8 ounces)
Have Grown Well and Keeper

Baxter's Bush Cherry
Fruit Size: Small (1-2 ounces)
Have Grown Well

Better Boy
Fruit size: Medium (8-10) ounces)
Have Grown Well

*Big Beef
Fruit Size: Large (10 to 12 ounces)
Have Grown Well and Keeper

*Celebrity
Fruit Size: Medium (6 to 8 ounces)
Have Grown Well and Keeper

Champion II
Fruit Size: Medium to Large (8 to 16 ounces)
Have Grown Well

Test Out New Tomato Varieties

Cherokee Purple
Fruit Size: Large (10 to 16 ounces)
Have Grown Well and Keeper

Costoluto Genovese
Fruit Size: Medium (4 to 6 ounces)
Have Grown Well

Delicious
Fruit Size: Large (10 to 16 ounces)
Have Grown Well and Keeper

*Early Girl 
Fruit size: Medium (6-8 ounces)
Have Grown Well and Keeper

*German Johnson
Fruit Size: Large (10 to 16 ounces)
Have Grown Well and Keeper  

Gladiator
Fruit size: Large (8-12 ounces)
Have Grown Well and Keeper

*Golden Jubilee
Fruit Size: Large (6 to 8 ounces)
Have Grown Well and Keeper

Hawaiian Pineapple
Fruit Size: Large (12-16 ounces)
Have Grown Well

*Homestead
Fruit Size: Medium (6 to 10 ounces)
Have Grown Well and Keeper

*Juliet
Fruit Size: Small (1-2 ounces)
Have Grown Well and Keeper

*Marglobe 
Fruit Size: Medium fruit (6-10 ounces)
Have Grown Well and Keeper

*Matt's Wild Cherry
Fruit Size:  Small (1 ounce)
Have Grown Well

Mr. Stripey
Fruit Size: Large (8 to 16 ounces)
Have Grown Well

Park's Whopper
Fruit Size: Large (10 to 16 ounces)
Have Grown Well

Polish Linguisa
Fruit Size: Medium (6-8 ounces)
Have Grown Well

*Porter
Fruit Size: Small to Medium (2 to 4 ounces)
Have Grown Well and Keeper

Principe Borghese
Fruit Size: Small (2 ounces)
Have Grown Well


Please note that fruit size can vary based on growing conditions and care, so the size ranges provided are approximations.  Additionally, there are many more disease-resistant tomato varieties available, and each may have its unique characteristics. When selecting tomatoes for your garden, consider factors such as your specific climate, growing conditions, common diseases, and taste preferences to find the varieties you will enjoy growing, sharing, and eating.


At My Shop: Vegetable and Tomato Seeds


"A Garden Wants to Give"
Cheers!

Gary (The Rusted Garden)


Subscribe to my YouTube Channel The Rusted Garden Homestead
Over 650,000 Subscribers and Over 2000 Garden Videos Designed to Quickly Present Information!


Visit The Rusted Garden Seed and Garden Shop
for your Seeds, Starting Supplies, Fabric Pots, Neem Oil,
Peppermint and Other Oils, Calcium Nitrate and More.
The Rusted Garden Seed and Garden Shop


Saturday, July 22, 2023

The Potential Cause and Treament for Deformed Tomato Bottoms or Tomato Catfacing?

Tomato catfacing is not a virus or fungus, it is a physiological disorder that affects the tomatoes development. It causes deformities and irregularities on the fruit, giving them a distorted appearance similar (in theory) to a cat's face, hence the name. However, I hope to never see a cat's face looking like some of my early distorted tomato bottoms. 

The deformities most often occur on the bottom but can also show up on the sides and top of the tomatoes.  Catfacing is most likely caused by environmental factors during fruit development. My belief is it is cause be temperature dips into the 40's in late spring and fall. You typically only see this occur on the first tomatoes of the season. However, there are other suggested reasons for it.


Tomato Catfacing or Bottom Deformaties


Causes of Tomato Catfacing or Bottom Deformations

Cool Temperatures During Flowering: 
Can disrupt the pollination process, leading to irregular fruit development and catfacing. This is what I have found to be most true over the years.

Treatment: Plant tomatoes well after the last frost date in your area to lower the risk to cold temperature dips during flowering. Temperatures falling in to the 40's Fahrenhiet or below 10 degrees Celsius are the typical temperatures of concern.


Extreme Temperature Fluctuations at Fruit Formation:
Rapid temperature fluctuations, especially from high heat days to cool nights may be the cause of catfacing. I have found higher temperature days leads to blossom drop or fruit drop but not tomato deformities.

Treatment: Maintaining consistent temperatures would be the only options and besides using shade cloth, there aren't many options to address temperatures.


At My Shop: Neem Oil and Peppermint Oil


Excessive Nitrogen Fertilization: 
High levels of nitrogen can lead to vigorous vegetative growth. Fast growth is suggested as a cause to catfacing but I have seen little evidence of this.

Treatment: Use a balanced fertilizer with a lower nitrogen content, or avoid excessive nitrogen use once plants are established. 


Chemical Exposure or Spray Drift: Some chemicals, particularly those that kill weeds and grass may  disrupt fruit development and lead to catfacing. While this may be true, the entire tomato plant would be impacted and you would see distorted and twisted tomato leaves.

Treatment: Use chemicals and weed killers wisely. Try and avoid use around edible plants.


Genetic Factors: Certain tomato varieties are more susceptible to catfacing due to their genetics. I have found the heirloom tomatoes that produce larger tomatoes are more prone to deformations. But, only for the first few tomatoes when the flowers are forming during periods of potential cold night temperatures. I have not seen catfacing occur regularly over an entire season on tomato plant.

Treatment: Choose tomato varieties known for less catfacing, if this is a recurring problem with certain varieties grown in your garden.


Catfacing will not affect the taste or usability of the tomatoes. You can still eat them and use them as you wish. They are perfect for making tomato sauce. You may see this type of deformity occurring early in the season and again in the fall. Very rarely, if at all, is it an ongoing problem.


"A Garden Wants to Grow"
Cheers!

Gary (The Rusted Garden)


Tomato Catfacing on Heirloom Tomatoes

Subscribe to my YouTube Channel The Rusted Garden Homestead
Over 650,000 Subscribers and Over 2000 Garden Videos Designed to Quickly Present Information!


Visit The Rusted Garden Seed and Garden Shop
for your Seeds, Starting Supplies, Fabric Pots, Neem Oil,
Peppermint and Other Oils, Calcium Nitrate and More.
The Rusted Garden Seed and Garden Shop