FB HEADER

Search The Rusted Garden Journal: Just Enter a Key Word or Phrase

Showing posts with label Seed starting. Show all posts

Friday, December 24, 2021

Seed Starting Indoors 101: How to Grow Herbs, Flowers, Vegetables and Fruit Garden Transplants

The Rusted Garden Seed and Garden Shop


I will be doing at 2022 video series called Seed Starting 101. This series will teach you how to start seeds indoors, with the goal of having inexpensive transplants for your gardens. Transplants can easily cost $3-$5 a plant when purchased at stores.  Growing your own transplants, taking in all the start up costs, will cost you about .25 cents a plant or less. The lights, seed starting supplies, and seeds will last for years, further bringing down the cost of growing your own garden transplants. You can find seeds and seed starting supplies at my seed and garden shop.

There are 4 basic areas you need to learn about (first) to have success starting seeds indoors and to set up your own basic grow light station.  Consider this video the prerequisite courses to Seed Starting Indoors 101.


You don't need to buy expensive grow lights. Basic and inexpensive 4 foot white LED shop lights are perfect for starting seeds and growing transplants. Remember this... you are not growing them indoors to flower and fruit. You want to look at 2 ratings when buying shop lights.  Lumens is brightness and you want lights that have 5000 or more lumens. You can grow with as little as 3000L but it is worth the time to look for 5000L or more. The next rating is light color and you want daylight as it mimics the sun. The Kelvin rating you want is 6500K but anything between 4100K and 6500K will work. Sometimes the Kelvin rating is not present so look for the word 'Daylight' on the box. The basic shelf, for your setup, should be 48 inch to hold the lights and wide enough to hold a basic seed flat. A width of 18 inches is perfect.


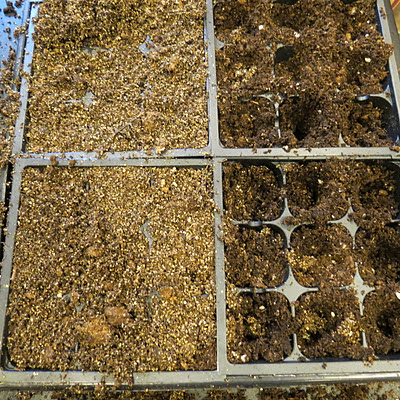
Seed starting mixes are typically made with peat moss. Peat moss has a very good chance of having fungus gnat eggs. They sit dormant until moisture and temperature are met for hatching. And that is found under your grow lights. Fungus gnats will infest your seed starts and cause problems. The best defense is sterilizing any starting mix with boiling water. You do not need soil life for growing seed starts. They will benefit from microbiology, wonderfully, once outdoors.  Boiling water will kill fungus gnats eggs and all life. That is good for seed starts.  Pour boiling water into the seed starting mix to hydrate it, to the point the mix will drip if squeezed. It is better to use more water than you need and let the mix dry for several days, if needed.  Not sterilizing starting mix is the biggest mistake all gardeners make.
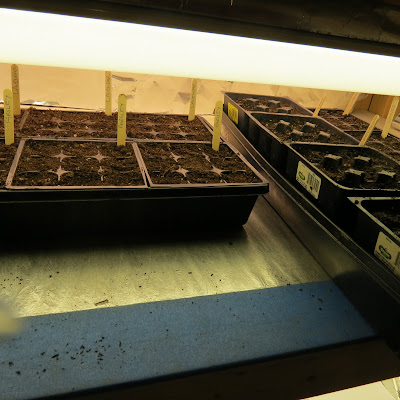


You can really use any kind of containers you wish but make sure they have holes on the bottom. Holes typically allow excess water to drain out. With seed starts, I recommend watering from the bottom for two reasons. It is easier and cleaner. Watering seeds starts from the top takes a lot of time, it splashes starting mix around, disturbs newly germinated seedlings, and it can spread fungus and diseases. Along with your container you will need a seed flat or, basically, a watering tray. A foil baking pan works. If you want to purchase a collection of flats, cells and transplant pots, please check out my seed shop. All your containers go in the tray. Simply fill the bottom of the tray/pan with water and wait 20 minutes. What ever is not absorb dump out.  Your seeds starts will wick water up from the tray through the container holes.


You will notice seed starting mix is al light brown color before it is saturated.  That light color is the clue that your seed starts need to be watered. Once your seed starts are bottom watered, the mix turns a dark brown. Seed starting mix always dries from the top surface down. The surface top of your seed starts will turn from a dark brown to a light brown and that is they can be watered.  I recommend waiting 1 or 2 days after the top turns light brown. There is plenty of moisture below the surface. Allowing the surface to dry helps manage potential fungus and mold problems.  You water your starts and transplants when they need it. Fertilizing should be done with any water soluble fertilizer at 1/4 the recommend strength for outdoor use. Your plant are growing in an artificial environment and over fertilizing can be an issue. The goal is to get the N, P and K numbers close to 1,1,1 for reference. Begin fertilizing your plants about 10-14 days after they germinate. You can feed them 1 or 2 times a month based on their size.


The above video will cover these prerequisite topics and prepare you for growing you own transplants. Remember transplants at stores can easily cost $3. Realistically, after buying all your supplies, you will save money or break even the first year. The more transplants you need the more you save.  After the first year, because you already purchased the lights, containers and shelving, the continuing costs are really additional seeds and seed starting mix. Each Seed Starting Indoor 101 class will be presented in a video at my YT Channel The Rusted Garden Homestead and also presented here on this blog. Good luck!


Subscribe to my YouTube Channel The Rusted Garden Homestead
Nearly 500,000 Subscribers and Over 1250 Garden Videos Designed to Quickly Present Information!


Visit The Rusted Garden Seed and Garden Shop for your Seeds, Starting Supplies, Fabric Pots, Neem Oil,
Peppermint and Other Oils, Calcium Nitrate and More.
The Rusted Garden Seed and Garden Shop


Tuesday, December 29, 2020

How to Have Tomato Transplants Ready for Your Garden in 6 Weeks - Container Size Matters

Visit The Rusted Garden Seed Shop for All Your Seed Starting Needs.

Growing tomato transplants isn't really difficult once you have the basics down. It just takes some time to learn. However, growing large plants in 6 weeks, that are ready to be planted into a garden, can be challenging. The key is container size. Lighting, watering, and fertilizing will impact plant growth but cell or container size is often over looked. Generally speaking, a transplant's size is constrained by the growing space of the roots. The stronger and larger the root system, the more quickly the plant can grow in size. A lot has been written about lighting, watering, and fertilizing. I thought I would show you how container size impacts the growth of your tomato transplants. 


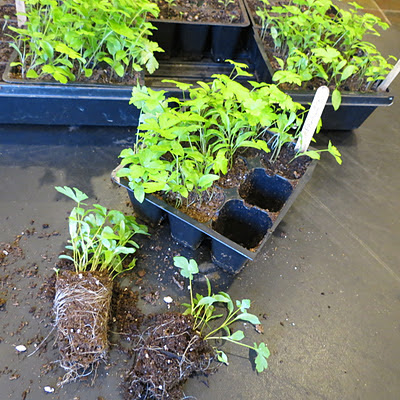
Here are several tomato plants that were all started on the same day with starting mix, lighting, watering, and fertilizing all being equal. The only difference is the size of the cells in which they were grown. The seeds were started on November 24th and today's date is December 29th. That is 5 weeks. You can see how the seeds started in the larger 6 pack, on the right, are much bigger plants. The roots had more room to grow and expand. Therefore, their overall growth/size is significantly larger than the other plants. The tomato transplants in the middle had more space for root growth than the plants on the left. You can also see a size difference in those plants.


Room for roots is the 'overlooked' key to getting transplants garden ready in 6 weeks. The plants on the left and in the middle are really ready to be potted up into larger containers and need a couple more weeks of growth. Starting plants in larger cells not only brings you larger transplants over the same time period, it can save you time, by removing the need to up-pot/repot plants. The container size you choose, to start your tomato transplants in, is really a function of space available under your grow-lights and the amount of transplants you are growing. 


The plants were watered equally and were fertilized around the 2 week and 4 week mark with a diluted water soluble fertilizer. The next step for the 5 week old plants, on the right, is acclimation to the the outdoor sun. Since seed starts are grown indoors, they do not have protection from the ultraviolet rays of the sun. They need to be slowly exposed to the sun and elements over a 7 day period. This additional week of acclimation brings the plants to 6 weeks of growth. They would be ready to go into the ground, if my ground wasn't frozen. Keep in mind that tomato transplants are best grown in soil that has reached 50 degrees and when the danger of frost has well passed. Here is the video that goes along with this blog post.


Click to Visit My Seed Shop for Starting Supplies


The pictures below show how the root systems filled the actual growing space of the large, medium, and small cells almost equally over 5 weeks. The root growth is more expansive when the plants are given more starting mix to grow within from the start.  That is, there are more roots and root surface area in the larger cell. You can see how growth was restricted due to space limitations. Smaller cells do restrict the growth of the stem and leaves by limiting root growth or expansion.. Each cell type has value based on what you are growing, your space, and timing for getting plants into the garden.

You can find seed starting products at my seed and garden shop: Starting Cell & Flats. The largest cell in the this post is listed as Medium Cells at my shop.


Alternatives to purchasing cells could be recycled yogurt containers, cut water bottles, repurposed nursery pots or any plastic container. Make sure you place holes in the containers for drainage. Root systems of your transplants will quickly grow and expand to fill the space of the containers you use. The more root growth you have to start, the more top growth you get. Addressing root growth will allow you to grow large tomato transplants in 6 weeks.


Larger Cells - No Need to Up-Pot


Medium Cells - Up-Potting Perhaps


Small Standard Cells - Up-Potting Needed


Subscribe to my YouTube Channel The Rusted Garden Homestead
Nearly 500,000 Subscribers and Over 1250 Garden Videos Designed to Quickly Present Information!


Visit The Rusted Garden Seed and Garden Shop for your Seeds, Starting Supplies, Fabric Pots, Neem Oil, Peppermint and Other Oils, Calcium Nitrate and More.
The Rusted Garden Seed and Garden Shop


Wednesday, December 25, 2019

Starting Seeds Indoors – A Video Series: How to Make $500-$1000 Selling Vegetable Seed Starts

The Rusted Garden Seed and Garden Shop


Starting Seeds Indoors – A Video Series: 
How to Make $500-$1000 Selling Vegetable Seed Starts

The simple answer… learn how to start seeds indoors and...

Do a plant yard sale this spring or early summer (do one again in the fall) in your front yard. You can also, find spring community yard sales or church yard sales and get a table. Grow tomatoes, peppers and herbs as your main stock by starting them indoors early.  You want these plants to be about 8 weeks old when they go to sale. Start them indoors in small cells, pot them up and get the acclimated to the sun.  Transplant them up to 8-10 ounce cups. You can use Styrofoam (least expensive), plastic cups, peat pots or buy nursery pots based on your budget.

My 2020 YT series that is being done in real-time will cover all the steps for growing the transplants and discuss the yard sale idea.

Find me on Instagram under The Rusted Garden to learn about gardening:

Many times, you can start cucumbers, zucchini, squash, kale and more too but the timing varies based on where you live.  You want these plants to be about 4 weeks old when they go to sale.  Start these plants in the larger cups.

Years ago, I would do a plant sale on my driveway and get a parking space at our local community spring flea market. I did a pre-sale to friends and over the years had ‘customers’. I no longer do that. When I was, I would make between $500 and $1000 selling plants for $1 each.  You can easily sell them today at that price or even $2 a plant or 3 for $5. This gave me all the extra money I needed for my mulch, wood and other garden supplies. The key is to start indoors.

If you don’t need to sell them, starting indoors can easily save you $500 to $1000 a year.  Transplants easily cost $2, $3 or $4. If you are buying perennial flowers you might spend $5-$10 a pot.  The cost of buying shelves and lights to get started is not as expensive as you might think if you follow my videos. You don’t need to buy expensive grow-light systems. Build them yourself.  Plus, everything should last you 10 years. Divide the cost of setting up by 10 and it isn’t that bad.

Follow me on YT under The Rusted Garden. I am doing a complete 2020 series on starting seeds indoors. The first 4 videos are below and they cover everything you need to know to get started. They cover basic seed starting supplies, lighting, shelving, starting mixes and getting the seed cells ready for planting. Future videos will cover starting perennial flowers, herbs, onions, peppers, tomatoes and other vegetables indoors.  Think about having a plant yard sale and fund your growing garden.

Video One:
Starting Vegetables Seeds Indoors: Purchasing LED or Fluorescent Grow-Lights - Kelvin & Lumen Scales


Video Two:
Starting Vegetable Seeds Indoors: Cells, Trays & Starting Mix - How to Stop Fungus Gnats 100% 


Video Three:
Starting Vegetable Seeds Indoors: Selecting Shelving & Building an Indoor Grow-Light Station Basics


Video Four:
Starting Vegetable Seeds Indoors: Preparing Containers for Planting, When & How to Water Seed Starts


Please Help Support My Channel: The Rusted Garden Homestead - Thanks!

I now have an Amazon Influencer's Storefront.
As an Amazon Associate I earn from qualifying purchases. It is free to use.

The Rusted Garden Amazon Direct Link
I turn most of that back into the garden and videos. Greatly Appreciated! - Gary (TRG)

Or go directly to the different collections at my Amazon Influencers Storefront...

Products in My 2020 YouTube Videos 
Seed Starting Supplies and Grow-Light Stations
 Pots and Small Greenhouses 
Better Greenhouses, Shade Cloth, Tunnels and Cold Frames
Fertilizers and Amendments: Indoor and Outdoor Gardening 
Disease and Pest Management  

Subscribe to my YouTube Channel The Rusted Garden Homestead
Nearly 500,000 Subscribers and Over 1250 Garden Videos Designed to Quickly Present Information!


Visit The Rusted Garden Seed and Garden Shop for your Seeds, Starting Supplies, Fabric Pots, Neem Oil,
Peppermint and Other Oils, Calcium Nitrate and More.
The Rusted Garden Seed and Garden Shop