FB HEADER

Search The Rusted Garden Journal: Just Enter a Key Word or Phrase

Friday, March 8, 2013

Planting 9 Types of Great Cool Season Vegetables

Planting  9 Types of Great Cool Season Vegetables


Why do some vegetables grow best in cool weather?

The best answer is the simplest answer. When it gets warmer the plants move from leaf or vegetable production to reproducing. Radishes get woody. Greens get bitter. Broccoli flowers. They do this to typically create seed heads or seed pods. The cool weather is the time for them to grow and mature. The warm weather is time for them to bolt and produce seeds. Some vegetables will grow all season long but can handle the cold and frost, so why not get them in the ground and to your table as soon as possible!


What are the cool weather months in Maryland?

There are two cool weather season: Spring and Fall. The spring cool weather season is roughly the beginning of March through the end of May. The fall cool weather season is mid to late August through the the end of November. If you use a cold frame you can start the season earlier in the spring or prolong it in the fall.  A lot of vegetables prefer the cool weather and grow best during those times.


Vegetables that Like The Cold - The Rusted Garden Blog


Some of the cool weather crops to consider:
    • Radishes
    • Lettuces of every type and don't forget Spinach.
    • Kale and Collard
    • Kohlrabi
    • Peas
    • Swiss Chard
    • Broccoli, Cauliflower and Cabbages.

There are more cool weather crops. Some of these plants are best planted directly from seed and some are best planted as transplants. This varies a little based on your planting zone. Maryland is zone 7. You can purchase transplants from your local nursery or garden center. You can also grow them indoors from seeds. In the case of lettuces, I plant both seeds and transplants. Seed starting in doors or using transplants helps get garden produce to your table as soon as possible. Transplants will mature to table as your seeds take hold. March is the time to plant. You don't have to wait for the warm tomato weather to start planting your garden.


Shouldn't I worry about frost?

Yes and no. All of the vegetables I mentioned can handle frost as seeds. Most of them can handle frost as seedlings. Many of them can handle light frost as plants. Some plants can actually freeze. Some of them taste better with a light frost. I have kale, spinach and onions that made it through the entire freeze of winter. As we go through how to plant each vegetable, I will talk a little bit about frost and freezing.

The real risk of damage is consecutive days of all day freezing temperatures. Even a little snow won't matter. Your are looking for mostly 35+ degree night and 45+ degree days as the starting signal to plant. A couple hours of freezing temperatures at night and frost won't do much damage. It is extended freezing periods that cause harm.


Preparing your garden

I clear out old plants and refuse. I turn the soil over and break up clumps to about a depth of 12 inches. I do not fertilize at this point. The best thing to do is to clean up your garden and turn the soil over on a day when it isn't too muddy or too frozen. That's pretty much all you need to do to get started for the cool weather of spring.

Planting Radishes

Radishes need loose soil to about a depth of 8-10 inches. They can be planted once the soil can be worked. Most radish types mature within 25 to 30 days. Radishes should only be planted as seeds and there are dozens of radish seed types at your local garden centers. I recommend buying several varieties.


Basic Radish Rows - The Rusted Garden Blog

Plant your radishes in rows at a length of your choice. Plant them about 1/2 inch deep. You should cover them with fine soil. Just make sure the soil isn't too clumpy. The seed packets will have directions if you want exact details. I plant each seed 1/2 inch to 2 inches apart across the entire length of the row. The variance in spacing is based on the size of the mature radish. Smaller radishes can be planted more closely together.

I space my rows about 6 inches apart. I have never had trouble with radishes maturing this way. The trick is to harvest some radishes early and harvest every other plant. This way you get to enjoy some baby radishes and you give the others space to fully mature. You can crowd the seeds a bit and thin if you want.


Different Types of Radishes - The Rusted Garden Blog

Some radishes grow bigger than your basic round radish such as 'White Icicles'. You can plant larger growing radishes the same way as I described but you will need to thin the plants earlier to be 1-2 inches apart when the plants reach about1-2 inches in height. I would check the seed packs of larger radishes for information on thinning and spacing.

If you want to have radishes through the month of May, plant new rows every two weeks starting in March with your last row being planted during the first week of May. You don't want to sow so many radishes in one planting that you end up with too many to eat in one harvest. The good news is radishes last longer in the ground when the day temperatures are cool. Once it get's warm they get woody.

A little frost typically isn't an issue with radishes. Even it is, by planting every two weeks you will get a good crop if the first fails. I have never had a crop fail even with a frost.


Planting Lettuce

Lettuces should be planted as seeds and as transplants you start indoors. This way your garden produce will come more quickly to your table. Pick out whatever types of lettuce seeds you want. I plant lettuce seeds around mid March. One way I plant them is in a two to three foot row and I disregard the seed packet directions. I dig my rows no more than a 1/2 inch deep and sprinkle seeds into the row so the land about 1/4 inch apart. I pay no mind if they touch. I probably drop 25-35 seeds into a row. I cover them with fine soil. Lettuces should be planted in soil that was loosened to a depth of 8-10 inches.

I plant the seeds this way because lettuces grow fast when the weather hits the right temperature. When the seedlings reach 2 inches tall, I carefully dig them up when the soil is more dry then wet. I space the seedlings out using a minimum of 4-6 inches between plants and I tuck the transplants into spaces all over my garden. Wherever there is space there goes a lettuce transplant I grew from seed. This is just one way to plant lettuces. My transplants are the thinned out lettuces.


Lettuce, Chard & Radishes - The Rusted Garden Blog

Most types of lettuce can withstand frost and can actually freeze. I have watched this happen over and over again as my Fall crops hit the November and December freezes. Essentially, lettuce can freeze and freezing does not destroy/burst the plant's cells. So when it warms up, the lettuce is unharmed. Eventually, continued freezing temperatures will kill it. That is usually due to the lettuce roots freezing. So some frost and even freezing is okay.

Because lettuce can withstand some frost and leaf freezing, I also buy lettuce transplants from my local garden center and grow my own. I look for different varieties and get them out as soon as possible. The lettuces you buy as transplants should be healthy looking (of course) and 3-5 inches tall. I plant them about 6 to 12 inches apart in my garden. The larger spacing is because I am growing them to full maturity. If you want to grow baby lettuces or 'cut and come again lettuce' you can plant them closer.


Different Ways to Plant Lettuce Including a Scatter Plot Method


I also plant them closer together, as mentioned, because I harvest a lot of lettuces when they are young as 'cut and come again'. A good tip is to cut the lettuce off at ground level and leave the roots in the ground. Most lettuces will grow new leaves and you can get several harvests from them.

Mixing up seeds and transplants will get you more produce. As my lettuce seeds I planted first, grow to 2-3 inches, the transplants from the garden centers are maturing for harvest. This way I get more lettuces to my table through the cool spring season. There are many ways to plant lettuce. I am just suggesting a few ways that work for me.


Planting Spinach

The best way to plant spinach is to turn the soil to a depth of 10-12 inches and plant seeds. I poke a hole in the ground with my finger to about 1/2 inch. Again, the seed packets will give you details but they usually say plant rows. I don't plant them in long rows.

I create a roughly shaped box that is typically 24 holes by 24 holes. I make my holes 1 to 1 1/2 inches apart and typically create a box-like or square planting in the ground. I drop in 1 seed per hole and cover with loose soil. If you a growing large leafing varieties, you can space the holes 2 -3 inches from each other.

Frost and freezing doesn't seem to bother many types of spinach. I have green spinach now that survived the entire winter above ground. It stopped growing during the winter but the green that was there in December stayed until March. It is now growing and getting bigger. I suggest you do a couple of plantings of spinach every two weeks up through April. I used to think spinach transplants were unnecessary but they work well. If you plant on seed per cell, you can get some plants into the garden that will mature nicely as you what for you seeds to take hold and grow.


Planting Kale and Collards
 
 From experience, kale and collards are easily grown indoors and make great transplants. Start them indoors 4-6 weeks early. Most kale and collards get quite large and need to be planted 12 to 18 inches apart.  Kale and collards are great to grow because the can be harvested one leaf at a time or in bunches. There are dwarf variates if space is an issue. I plant them as transplants as to get mature plants in the ground but for a household of four you really don't need any more than 4-6 plants of any one variety. They get large.

Kale Transplants I Grew - The Rusted Garden Blog

Kale and collards are biennials. That means they will grow spring, summer, fall, winter (if mild enough), spring again and flower. I eat the flowers of my second year kale and collards and they are delicious. With some care and pest management you can eat call spring-fall in Maryland. The first year plants don't bolt and flower like other cool season crops.
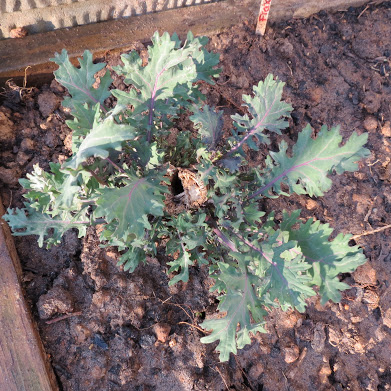

Over Winter 'Red Russian' Kale - The Rusted Garden Blog


Planting Kohlrabi

It is described as an above the ground turnip with a cabbage broccoli type flavor. I plant them as seeds and as transplants I grow. They look very much like kale and collards as the are growing up but form a great tasting baseball size bulb above the ground. You can eat the leaves too.


Picked Kholrabi - The Rusted Garden Blog


You should thin them to the directions on the seed packet when the plants are 1 to 2 inches tall. The get quite large. They like the cool weather so you can get them in the ground in later March. I plant my transplants 4-6 inches apart as top get a nice large apple sized root. It is above ground remember.


Planting Peas

I love peas. There are basically two types. Peas that you eat in the pod and use whole or peas that you take out of the pods and just eat the peas. Or better known as edible pods or non-edible pods. You can go to a garden center and buy what every you like. You plant peas can plant peas as seeds or transplants. I once believed they could not be planted as transplants. I experimented and was wrong.


They like loose soil. I plant my peas 1 inch deep and space them 2-4 inches apart when putting them in the ground.  I use my index finger to make the holes. I typically plant them along a chicken wire trellis as peas MUST have something to climb up. I also plant peas in containers and I have a video that shows you how to do that. Containers are great to use because you can plant them sooner while the garden beds warm up and dry up. Peas don't do well in cold soggy earth. They rot.


Grow Peas in Containers: Planting to Picking


Peas can handle light frost but really can't handle freezing. But they too can be planted as soon as the soil can be worked and really only pop when the time is right. Two plantings of peas, 2-3 weeks apart will work best for continued production.


Planting Swiss Chard

I grow 'bright lights' swiss chard. It is a great green that will grow spring till fall. It doesn't bolt either and you can keep harvesting it the entire growing season. I typically start them indoors or buy transplants. They can handle a light frost and can go in the ground as soon as it can be worked.


Mature Swiss Chard - It's a 3 Season Garden Vegetable


They grow quite large and should be planted with spacing like you would use for kale and collards. I plant mine at about 12 inches. In the above picture, they are the 4 plants closest to the front. I have 4 plants in a 4 foot row. They look like leafy greens with some red on the stem. The stem is great in a stir-fry too!


Planting Cauliflower, Broccoli and Cabbages

I only plant cauliflower, broccoli and cabbages from transplants. Every time I tried to plant cauliflower and broccoli as seeds (in Maryland) they did not mature quick enough before the warm weather arrived and they bolted. They flowered and I did not get to eat them. They really like the cold and the sooner you get them in the better. Warmth tends to quicken the flowering of your broccoli and cauliflower.

Transplants work well for all three of these vegetables. Cabbages won't really bolt they just won't get as large. So, I would also recommend using transplants for cabbages to keep them growing in the cool weather. All three vegetable types can withstand frost and freezing. I plant my cauliflower, broccoli and cabbages mid-March and I space them 12-18 inches apart. You have to get these in early because they take a while to mature. And they get large. I tend to plant things more closely together. More spacing is okay. I use a raised bed, so I can plant them closer together.


Watering Your Garden

Keep your garden well watered using a gentle spray. The last thing you want to do is blast the seeds or seedling out of the ground with a hard stream of water.  During the cools season you'll have to water about every second or third day when you get consecutive sunny days. If it is cloudy the soil tends to stay moist. Just don't let the seeds and seedling dry out or create pools of soggy soil.


Join My Google+ Community Our Tomato and Vegetable Gardens (600+ Members!)
Over 100 HD Garden Videos: Join My YouTube Video Gardening Channel
Follow and Organize The Rusted Garden on Pinterest

Wednesday, March 6, 2013

Ten Good Habits to Manage Early Tomato Blight: And Other Disease

Subscribe to my YouTube Channel The Rusted Garden
Over 800 Garden Videos Designed to Quickly Present Information!

Please Support The Rusted Garden by Shopping through my Amazon Affiliate Link

Ten Good Habits to Manage Tomato Diseases


What is Early Tomato Blight?

It is a fungus. A fungus that releases spores. The spores spread onto other leaves. The spores spread to other plants. The fungus is Alternaria Solani. It is one disease your tomatoes can get. The disease typically takes hold on the bottom leaves of tomatoes, typical when fruit first sets and humidity comes into the picture. It starts out as tiny brown spots on lower leaves. For My area, in Zone 7 Maryland, Early Blight shows about mid July when the humidity, as I mentioned, arrives.

The initial brown spots maybe hard to see at first. The spots turn yellow, grow and spread. The yellow spots might have a light brown/black/gray center of concentric rings. The spots are a good size once the yellow ring forms. The discolored center looks like dried leaf surrounded by a yellow ring. This yellow ring with a brown center is what you use to identify Early Blight.


Early Blight - Concentric Brown Rings with Yellow Edges.

The picture of my tomatoes, below, have some leaves with blight.  It also shows the die back from determinate varieties like the one in the front and some plants just didn't do well with 95+ degree heat. The point is that it can be very hard to identify diseases like Early Blight, Leaf Spot and Late Blight from standard die back of leaves or other issues like ailments from nutrients. It is confusing. You should do a Google search for tomato disease pictures. It helps with identification.


Some Early Blight Spots - The Rusted Garden Blog

If left unmanaged the disease will travel up your plant and it can even damage the fruit. You will notice brown dots on the tomatoes if this happens. Eventually, the leaves die and drop off, leaving your fruit exposed to sun scalding. The plants weaken and often die or stop producing.

I wish the goal was total prevention of the Early Blight or any disease but I think a better goal is practicing good habits to manage down diseases and their damage.  If you can manage diseases (yes hopefully prevent it) so it progresses slowly then your tomatoes can often out pace the spread of the disease with its own growth and production. My growing area is know for Early Blight. A lot depends on the climate. Some of you will never see it. Last year it was not only was kept in check, I didn't see much of it. I practice most of these 10 habits. I just don't always have the time or space to practice them all.


How is Early Blight Spread?

As mention Early Blight is a fungus. When the fungus gets wet and conditions are right, spores are released. The spores spread the fungus. The fungus is spread by splashing water, human contact, wind and even insects. The spores can travel distances through hands, tools, insects and wind.

Early Blight needs warm wet weather to spread and grow. If you have warm weather and moisture, your garden is at risk. Early Blight, once established in your garden, can over winter in your garden on debris and weeds.


The Ten Good Habits for Managing Tomato Disease

Number One: Don't let it over winter!

You can't vacuum up the spores unfortunately. At the end of the season throw away, don't compost, all infected debris and surrounding debris. It is also important to pull up all the weeds in the beds as they take over in the Fall and early Winter period. Spores can over winter, as mentioned, on debris and weed hosts. You want to reduce the number of spores laying around in wait.


Number Two: Turn the soil in mid Winter.

The spores aren't super spores. Burying them into the earth helps remove them. Some people may not like to turn their garden in the Winter because it exposes the worms. I prefer to turn it because it also exposes snails and snail eggs. I figure the worms are plentiful in my area and I am only turning about 10 inches of the garden. The worms will survive and you can bury potential diseases that will die out in the earth.


Number Three: Create a soil barrier, also known as mulching.

Since Early Blight doesn't come right away, you have time to mulch and create a soil barrier. This is effective for many diseases in your garden. You can use newspaper, plastic, grass clipping or anything you wish. You want to create a splash barrier. Rain drops and over head watering, splash soil on to the tomato plants. That is one way to infect your plant. If you seal the soil then you will reduce the chances of spores finding your plant. I suggest using a layer of newspaper covered with mulch or grass clippings. Bottom line, you don't want your soil exposed to your plant.


Mostly Healthy Green Leaves - The Rusted Garden Blog


Number Four: Water from the bottom not the top!

The spores need moisture. Watering from the bottom prevents splashing as mentioned above, splashing is bad. Watering from the top of your plant makes for wet moist leaves and it creates a temporary humid micro climate. The moisture allows the fungus to produce spores. Dry leaves. Dry leaves. Dry leaves. I don't recommend watering in the evening. Let the sun be your friend and dry up the garden area. Night time watering lets the moisture sit all night. Dry leaves. Did I mention Dry leaves?


Number Five: Air circulation, plant staking and no touching.

Air circulation allows the wind to blow through your plants. This allows for the timely drying of leaves and it helps break up micro climates. If your plants are packed too tightly together, they themselves become barriers to drying. Staking your plants to poles and using cages helps them grow upright and it creates gaps between the tomato plants. You want to wind and sun to reach through and around your plants. Moisture is needed for Early Blight to spread. Dry is good. Staking and caging also keeps each plant from touching. The tomatoes should be planted with enough distance that only minor pruning is needed to keep them from touching each other.


Under Standing Soil Splash and Disease Prevention


Number Six: Remove 12-18 inches of bottom leaves and prune your plants.

Early Blight typically grabs hold on the bottom leaves first. I already mentioned soil barriers and watering from the bottom of the plants to prevent splashing. The next step is to create a 1-2 foot space (depending on the adult size of your tomato plant) between the garden soil or mulch and the first leaves of the tomato plant. Prune the bottom leaves from you plant, over time, as it grows, to create an 12 to 18 inch barrier gap. If the spores can't splash upwards and reach the leaves, they can't take hold. The stem usually isn't a place for the spores, though it can be. If you have large plants, you might consider cutting off some branches to let the sun and wind blow through the main body of your tomato plant.


Number Seven: After the tomatoes set add some nitrogen.


A healthy plant tends to fight off the spores. You don't want to add too much nitrogen to your tomatoes before they set fruit. Too much nitrogen before fruiting leads to more leaves and less fruit. The leaves are what the spores want. Once the fruit is set, a nitrogen boost can help strengthen your plant. This is a one shot deal. This tip would basically include keeping your tomatoes well nourished as to keep them strong.


Number Eight: Remove infected leaves immediately.

A leaf should be completely green. Remove leaves that show signs of disease immediately. Look for brown spots or yellow spots or distress. Keep in mind your hands and tools can spread spores. Take precautions not to spread the spores yourself. You should remove leaves and prune when it is dry and sunny. Wash your tools and hands often.


Number Nine: Spray the plants proactively.


There are a lot of products out there for Early Blight. I suggest checking them out and deciding what you are going to use. I use wettable sulfur. It creates an environment on the leaves the spores don't like. The key to spraying with wettable sulfur is to do it weekly before signs of the disease shows. Other products also help stop the spread. Whatever you select, the key is to spray early and regularly.


Number Ten: Rotate your crop.

I leave this tip for last because most of us do not have enough space to do this effectively. Because Early Blight also effects other plants, rotation in small gardens isn't practical or even possible. But if you have the room, move your tomatoes to plots that are free of Early Blight spores. You can find standard rotation plans on the internet. I wish I had more room to do this. A typically rotation schedule suggest 3 years away from a plot before returning the same crop.


In Summary: Managing Tomato Diseases
 
Most things in the garden are managed to the lowest possible level of damage. Early Blight and other diseases are handled the same way. These ten habits will hopefully prevent Early Blight from coming to a tomato near you.

I also suggest Number Eleven... water your plant with an aspirin. I have been reading that salicylic acid, in aspirin, triggers a defense response in tomatoes. It boost the immune system so to speak. Do a search on aspirin and tomatoes. It is interesting, I have been doing it several years and believe it greatly helps.


Join My Google+ Community Our Tomato and Vegetable Gardens (600+ Members!)
Over 100 HD Garden Videos: Join My YouTube Video Gardening Channel
Follow and Organize The Rusted Garden on Pinterest

Sunday, March 3, 2013

How to Effectively Start Tomatoes Indoors: Germination to Transplants

How to Effectively Start Tomatoes Indoors
(Preparing the Starting Mix, Seed Cells and Planting)

My last tomato blog entry talked about maturity dates and when to start tomatoes indoors. One key factor you have to take into account is how long you can manage your seedlings/transplants before you can get them into the ground. I've made my decision and it is now tomato seed starting time!

Keys to Effectively Starting Tomatoes Indoors
  1. Pre-moisten the starting mix
  2. Thumb pack the seed cells
  3. Plant 2-3 seeds per cell and thin
  4. Bottom water
  5. Appropriate lighting (2 inches above seed/leaves)
  6. 1/2 strength liquid fertilizer
  7. Transplant them from the cells at 4-5 weeks.
  8. Acclimation: Getting them outside safely.

The video shows you the ENTIRE process of how to start your tomato seeds indoors and get them into transplant cups when they mature in about 4-5 weeks. It covers all the above topics. In this blog entry today I am only covering Key Points 1,2 and 3.


Seed Starting Mix

Seed starting mixes often come dry or have very little water in them. Make sure you mix some water into your seed starting mix before you plant your tomato seeds. A pre-moisten mix will help ensure germination is prompt and it helps with bottom watering - water absorption.


Preparing the Seed Cells

The seed cells need to be properly packed with the starting mix. The best method to pack the cells is a method I call: Thumb Packing. Fill the seed trays with starting mix and then pack each cell down with your thumb and refill. You want to have a very firm planting base for your tomato seeds. A loose base will risk seeds falling to the bottom of the cell and it diminishes strong root growth.


Planting the Tomato Seeds 

You have to decide how many tomato transplants you want and if you are like me, maybe a better question is... how many tomato transplants can your garden actually hold?

Believe it or not, tomatoes are fairly hardy and you can plant 4 or 5 seeds per cell. However, the more tomatoes you have in the cell the greater the risk of transplant shock. You are tearing roots when you try and separate them.

When they (4 or 5 transplants per cell) are a few inches high, you can gently pull them apart and transplant them into cups. They will grow. An old tomato video I did showed that method. I had greater need for more transplants during the time I made that video.

The tomato seed starting video I did  this week assumes you are growing the seedling tomatoes just  for your garden and maybe a few friends.

Plant 2-3 tomato seeds per cell and place them in the corners of the cells. Press them down about a 1/4 inch with a Popsicle stick and cover lightly.

You don not need to keep all three seedlings. You can thin them to the strongest seedling per cell. You can also keep 2 or 3 seedling growing in the cell. It is your choice. The major difference is that the more plants you have in the cell, the more they compete for resources and the sooner they need to be transplanted into another container.  Three plants growing in one sell will be smaller than one plant growing in one cell over the same period of time. The risk of transplant shock is also higher.


Watering and Lighting

I will fully address watering, lighting and fertilizing in a future video and blog entry. As for now, fill the flat with water and let your seed cells absorb water for 20-30 minutes after you planted the tomato seeds. You should dump out any excess water. You should set your lights about 2 inches above the starting mix. You want germinating seeds to hit intense light as soon as they come out of the ground. This prevents plant 'legginess".


Join My Google+ Community Our Tomato and Vegetable Gardens (600+ Members!)
Over 100 HD Garden Videos: Join My YouTube Video Gardening Channel
Follow and Organize The Rusted Garden on Pinterest

Saturday, March 2, 2013

My New Garden Video Series: 60 Seconds or Sow - 5 Gardening Tips

60 Seconds or Sow: A New Vegetable Garden Video Series

I decided to start a new vegetable gardening series called: 60 Seconds or Sow. In about 60 seconds, I will cover a topic that I hope you find useful. No frills, just the facts to help you manage your vegetable gardens. I figure we don't have hours to watch videos when the garden is calling.

If you have been following my blog for a while, these are tips and techniques you have seen in longer videos. These videos are however about 60 Seconds or Sow...

60 Seconds or Sow - A Garden Video Series - The Rusted Garden Blog

Here are the topics of the first 5 videos in this new series. You can view all 5 in under 7 minutes. They are 60 Seconds or Sow...

  • Using Cinnamon to Prevent 'Damping Off' Disease on Seedlings
  • How to Perfectly Prepare Your Seed Starting Cells for Germination and Growth
  • Using Aluminum Foil Food Trays to Manage Your Vegetable Transplants
  • How to Use Aspirin to Bolster Tomato Plant Defenses
  • How to Use Baking Soda and Dish Soap to Treat and Manage Powdery Mildew

Using Cinnamon to Prevent 'Damping Off' Disease on Seedlings


How to Perfectly Prepare Your Seed Starting Cells for Germination and Growth


 Using Aluminum Foil Food Trays to Manage Your Vegetable Transplants


 How to Use Aspirin to Bolster Tomato Plant Defenses


 How to Use Baking Soda and Dish Soap to Treat and Manage Powdery Mildew


Join My Google+ Community Our Tomato and Vegetable Gardens (600+ Members!)
Over 100 HD Garden Videos: Join My YouTube Video Gardening Channel
Follow and Organize The Rusted Garden on Pinterest

Friday, March 1, 2013

Ten Things About Tomatoes: It is Tomato Time in Zone 7!

Ten Things About Tomatoes: It is Tomato Time is Zone 7!


Tomato Thing One: Two Types of Tomatoes
Determinate and Indeterminate
There are two types of tomato plants. A tomato plant is either a determinate plant or indeterminate plant. A determinate tomato grows to a set height and stops growing. The fruits mature all at once and the plant dies shortly after the fruits mature. This determinate type of tomato is great for getting the first round of tomatoes from your garden and they do well in containers. The indeterminate tomato continues to grow and grow until frost. It sets fruit throughout the season. Only frost or disease will stop an indeterminate tomato from producing. Think of it this way, a determinate tomato grows to a predetermined size. 

Tomato Thing Two: Plant Them Deep

It's a Vine

A tomato is a vine. When you plant them, you want to plant them deep in the ground. When you buy a tomato they should be 8 to 12 inches tall. You should plant the tomato to at least a third or half of its height. If the tomato is 12 inches tall then plant 4-6 inches of the plant stem below ground. Why? Because a tomato is a vine that will set roots from any part of the stem, if the stem is below the ground or on the soil. A strong deep root system leads to a stronger plant. 

Tomato Thing Three: Planting a Container?

Determinate Tomatoes

The determinate tomato grows to a set height. This makes them the best bet to survive in a pot or container. I recommend buying a very large container (5 gallon). A smaller container can work but you really have to keep an eye on watering. If you let the plant dry out, it really messes up the fruit. The fruit will crack. If you over water and then let it dry out and repeat, you will probably see your tomatoes rot from the bottom. This is know as blossom end rot. It is a calcium deficiency and occurs when the roots aren't watered properly and therefore can't absorb nutrients properly. An indeterminate tomato may just grow to large for containers. 

Tomato Thing Four: Prune Your Plant

They Can't Fair Without Air

Indeterminate tomatoes needs to have air circulating through and around the plant. Poor air circulation leads to disease. As your tomato grows, you should pinch off the leaves nearest to the ground. I try and keep 12 inches between the ground and the the first leaves (sometimes more). Now you can't do this all at once but as the plant grows taller, you should prune the bottom leaves to about 12 inches from the ground. This will allow air to circulate below the plant and make it harder for disease/spores to splash up on the plant. You will also need to prune back shoots/branches from the upper part of the plant. That sometimes means taking off two or three foot pieces of your plant. Painful to do but necessary. Air also needs to circulate through the plant. Air circulation helps keep humid air from sitting around the plant and it helps to dry the plant leaves after watering or a good rain. 

Tomato Thing Five: Keep Them Off the Ground

Staking

Tomatoes are vines. If you let them sprawl on the ground you will see them root from  the vine touches the ground. You will see additional vines growing all over the place and end up with a mess. Sure you will get tomatoes but you will also increase the chances of your tomatoes getting diseases like blights. A 6-foot stake is the best way to train your tomatoes to grow upwards and stay off the ground. 

Tomato Thing Five: Fertilizing

Feeding Your Friends

You know what happens if you over fertilize a tomato? You get a very happy large green plant with less fruit. I fertilize when the plant is planted and when the plant has been growing about 6-8 weeks. This is mid July in my area. It isn't etched in stone but that is how I do it.  A table spoons of 10-10-10 fertilizer deep in the hole and one higher in the hole when I plant. I typically give them a half of gallon to gallon sprinkle of Miracle Grow in June to keep them happy. In July I do a side dressing which is tossing some fertilizer on the ground about 6 to 8 inches from the stem. I drop a handful. I also give them a big drink of Miracle Grow. After that, fertilizing is done. You just don't want to give them so much nitrogen you end up with a great looking green tomato plant with a couple of tomatoes. Unless you are eating the leaves. If you are container gardening then I recommend feeding them weekly with miracle grow or the like when they are large.

Certainly replace my suggestions with organic products of you wish. 

Tomato Thing Six: Early Doesn't Mean Sooner

Warm Weather Plants

Tomatoes are warm weather plants. They need 50 degree nights and 70 degree days to really start growing. But more importantly the soil temperature needs to be 50+ degrees. You don't need to put plants in early before the temperatures are ready. Putting a tomato out April 10th doesn't mean it will be bigger than a plant you put on on May 1st come the middle of May. Sure, initially it might look bigger but once the heat hits, tomatoes grow. If it is colder in April your plant is just going to sit there in shiver mode and not really grow.  The plant you plant May 1st isn't really at a disadvantage. The bottom line is they will catch up to each other and you don't get fruit any sooner. So wait for the right temperature to plant. But once the temperatures comes, the first one to get them in the ground wins. 

Tomato Thing Seven: Water Evenly

Mulch Much Mulch

Two thing can happen with poor watering habits. If your plant gets stressed from too little water and then you soak it, it will develop cracked fruit. If you continually let the ground dry and then over water the plant and let it dry and over water, you'll increase the chances of blossom end rot. Basically, you mess the root system up and the plant can get a calcium deficiency and you end up with blossom end rot. Mulch is your best friend. I use grass clippings. I put down two inches of grass clippings and let it dry out. The next week I put down two more inches and let the clipping dry up and turn brown. I continue this throughout the summer. It is important to let grass clipping dry out before adding more. If you don't, you run the risk of developing smelly grass clippings which creates a bad smelling garden. Water regularly in the morning. I tend to water my plant from the bottom, with a hose, as to not soak the tomato plant leaves or splash mud up. I am always battling blights and mildew. If that isn't  a problem in your area, a sprinkler is fine. 

Tomato Thing Eight: Planting Location

Shading Other Plants

Tomatoes get quite large. You want to make sure you plant them in the garden so they don't grow up to shade out other plants. If you reach out both arms to the side and pretend the length of your arms is your garden, you can figure out where to plant the tomatoes. If the sun is mostly where your left hand is then you need to plant the tomatoes way down by your right hand. Get it? Sun mostly to the left of the garden will cause or cast shade to the right side of the plants. Sun to the right of the garden will cause or cast shade to the left side of plants. When in doubt go stand in your garden plot around 2 pm. Pretend your a tomato plant and see which way your shadow falls. I use raised beds and plant my tomatoes so the shade they produce mostly falls outside the box. 

Tomato Thing Nine: What the Tomato is VFF or VFTA?

Don't Worry About It

I know that isn't a great answer but they stand for disease resistances. If you don't run into tomato diseases then it doesn't really matter. Unless of course they come up with a tomato that is resistant to late blight. So far no luck. Most of us buy tomatoes from the garden shops and they usually stock the standard varieties that have these resistances. If you are buying seeds from catalogs the catalogs will tell you what the letters stand for. Fusarium and verticillum wilts. See it doesn't help. 

Tomato Thing Ten: There Is Never Enough Room

Just One More

If you love tomatoes then you'll agree there is just never enough room to plant all the tomatoes you want. Even if you expand your garden year after year, there seems to be a need for more space. There is always that variety you haven't tried but it's right there within your reach at your local nursery. You wonder if you could squeeze it in. You think you could possibly negotiate another garden bed from your wife. You ponder what you can trade her for a little more space. If you are like me - you buy it and worry about the space later. Remember, 2 plants is plenty of tomatoes for one adult. I can say it. I can write it but I don't think I can come to terms with it. A family of four and a garden of twenty plus plants last year... I know I can get in twenty this year. Enjoy!


Join My Google+ Community Our Tomato and Vegetable Gardens (600+ Members!)
Over 100 HD Garden Videos: Join My YouTube Video Gardening Channel
Follow and Organize The Rusted Garden on Pinterest