Subscribe to my YouTube Channel The Rusted Garden
Over 800 Garden Videos Designed to Quickly Present Information!
Please Support The Rusted Garden by Shopping through my Amazon Affiliate Link
How to Build A Low Cost Basic Garden Vegetable Trellis
Please Support The Rusted Garden by Shopping through my Amazon Affiliate Link
How to Build A Low Cost Basic Garden Vegetable Trellis
Why Build a Vegetable Trellis?
 |
| A Finished Garden Trellis - The Rusted Garden Blog |
By using trellis shade, you can extend the season for cool weather crops like lettuces and other greens. The shaded cooler area will slow plant bolting. One way to get diseases in your garden is to have little air circulation and sprawling vines. The trellis allows more air movement in your garden and this benefit helps to quickly dries the leaves of the vines. The trellis aids in creating two good conditions that help prevent diseases and the spread of diseases in your vegetable garden.
The Trellis Materials
I
bought these at a home improvement store. A bag of six - 6 foot bamboo
canes at $2.97 a bag. The chicken wire measures 24 inches by 10 feet and
it cost $7.00. A trellis is an inexpensive way to increase space in
your garden. |
| Trellis Materials - The Rusted Garden Blog |
STEP ONE: Unroll the Chicken Wire, Walk on It, and Bend It in Half
Unroll
the chicken wire and walk on it. Chicken wire wants to roll back up and
it can be difficult to handle with just your hands. The best way to
handle it is with your feet and hands. Once it is unrolled, fold it over
to create two five foot sections. Make sure you walk on the crease of
the fold and firm it down.  |
| Roll Out Chicken Wire - The Rusted Garden Blog |
 |
| 10 Feet of Chicken Wire - The Rusted Garden Blog |
 |
| Fold and Crease - The Rusted Garden Blog |
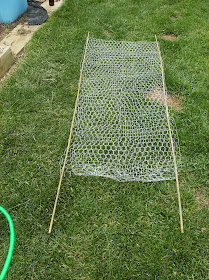
STEP TWO: Weave the Six Foot Bamboo Poles Up the Sides
Follow
the picture below and use four bamboo poles to weave up the sides of
the chicken wire. Insert the pole, starting at the bottom, and weave the
pole through every 5th or 6th hole. It does not need to be exact. Leave
about 2 inches of bamboo pole on top of the trellis and leave the rest
of the length on the bottom. The excess pole length is what gets
inserted into the garden earth. |
| Weave Pole Through Chicken Wire - The Rusted Garden Blog |
 |
| 2 Poles In - The Rusted Garden Blog |
 |
| 4 Poles In - Length at Bottom is for Ground |
STEP THREE: Insert the Trellis Into the Garden
It is important to leave several inches of pole at the bottom of the trellis (see above picture). That is what you will insert into the ground to anchor your trellis to the garden bed. The trellis can be opened to any length but I recommend a minimum of a 3 foot opening in the base of the trellis. Tie the tops of the poles off as pictured below.
 |
| Placed and Sunk in the Garden |
 |
| Tie Off Tops for Added Support - The Rusted Garden Blog |
STEP FOUR: Plant Your Vine Crops at the Base
You
can plant your vine crops on the inside or outside of the trellis. Make
sure you position your trellis in a way that it is easy for you to
reach in and pick the vegetables. You can grow anything you wish as long
as the single fruits stay under 2 pounds. If you grow heavier crops you
will have to figure out a way to support the heavier fruit. You might use a 5th and 6th pole up the middle of each side of the trellis for heavy loaded vines. A nice
shade area will be created beneath the trellis. You can plant lettuce,
spinach, radishes, or other vegetables that prefer cooler temperatures.
The shade slows down the bolting process. |
| Plant a the Base of the Trellis - The Rusted Garden Blog |

Join My Google+ Community Our Tomato and Vegetable Gardens (600+ Members!)
Over 100 HD Garden Videos: Join My YouTube Video Gardening Channel
Follow and Organize The Rusted Garden on Pinterest
No comments:
Post a Comment
Visit The Rusted Garden's YouTube Video Channel
Follow The Rusted Garden on Pinterest